If you're looking for a green bean casserole that's full of rich, creamy and comforting goodness, then you've found it in this savory recipe that goes “can free” using fresh, simple ingredients.
Green Bean Casserole, a True Classic
I suspect that it just wouldn’t be Thanksgiving Day without the classic green bean casserole as part of the festivities, now would it?
Green bean casserole is a familiar character in the pageantry of Turkey Day, a staple representative of good ol’ comforting Americana-style food.
The classic recipe really hasn’t changed since the 50’s. It still calls for green beans out of the can, mushroom soup out of the can, and crispy fried onions—you guessed it—out of the can.
And though I’ll admit that I tend to be a predominantly whole-foods-based recipe developer, I fell really hard for this particular little morsel of a casserole ever since my husband and I have been together. He took on the role of making the classic “out of a can” recipe, each and every year, Thanksgivings past.
Is Homemade Green Bean Casserole Better?
If a dish can be replicated using whole foods, and be made to have the same scrumptiousness as the original (if not more) by using homemade and whole ingredients you can feel good about eating, then that's the best route to go.
And let me tell you: this “can free” green bean casserole recipe is the best!
What you get with this homemade green bean casserole is a flavor that the canned version can't even compare to, because of the freshness and quality of the ingredients, which makes all the difference.
How to Make Green Bean Casserole
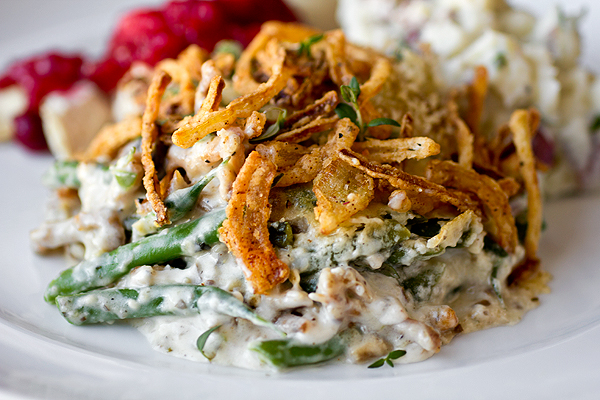
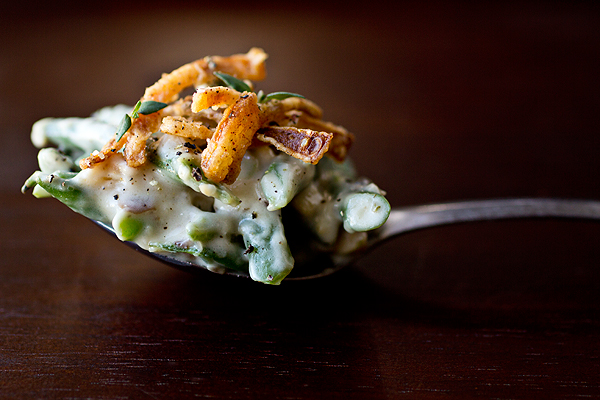
Using haricots verts (pronounced like harry-co-vair) or thin, French-cut fresh green beans, and making a creamy, herb-infused parmesan-mushroom sauce, from scratch, to bathe them in, can make a convert out of even the most adamant “classic” green bean casserole connoisseurs.
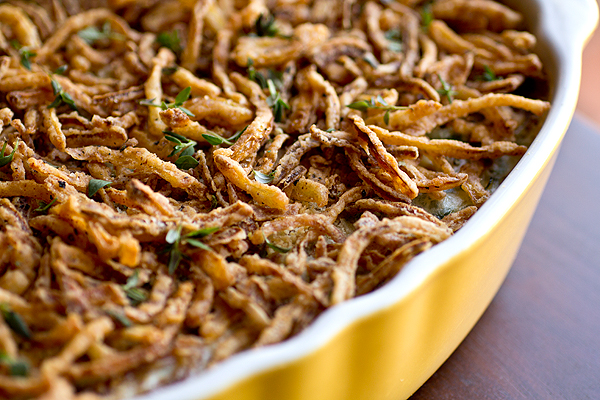
Top the whole thing off with homemade, seasoned crispy-fried onions, bake until golden and bubbly, and you'll have a really happy crowd on your hands.
Savory Green Bean Casserole is a must for the much-anticipated Thanksgiving holiday—without it, something truly special would definitely be missing.
Here's a quick overview of my green bean casserole recipe:
- First thing I do is prepare my mushroom cream sauce, and set it aside to cool.
- Next, I prepare my crispy fried onions, and set them aside.
- Then, I boil the green beans; but just until they're slightly tender, yet still crisp—they get an ice bath so they stop cooking.
- When I'm ready to assemble, I preheat the oven to 350° so it's ready.
- I combine the cream sauce with the green beans, and about ⅓ of the fried onions, in a large mixing bowl and toss everything gently together.
- The mixture then gets spread out evenly into a casserole dish and topped with the cheese.
- When ready, I bake the casserole for about 30 minutes, or until fully heated through.
- For the finishing touch, I add the rest of the fried onions and put the casserole back in the oven for another 15 minutes to make the top nice and crispy.
(You'll find the full recipe below.)

Green Bean Casserole Tips & Tid-Bits
- French green beans, aka “haricot verts” are the best: These thin, fresh, French-cut green beans are elegant, and are best for use in this recipe. The larger green beans are too waxy, and don't “melt away” quite as nicely into the sauce as these. You can typically find them pre-packaged.
- Make it easy, prep ahead: Blanch your green beans, prepare your sauce and your crispy onions a day or two ahead and keep in the fridge for ease. That way, on the day you plan to serve this casserole, all you'll do is combine the ingredients and bake.
- Sliced mushrooms, or even pureed for an extra silky sauce: When preparing your cream sauce, you can either leave your mushrooms in slices in the sauce for a chunkier texture, or puree the sauce to create a silkier and smoother texture that'll mimic the canned version of mushroom soup—it's up to you.
Feast your eyes on these, or just jump to the recipe:

Recipe
Green Bean Casserole
by Ingrid Beer

Category: Side
Cuisine: American
Yield: Serves 8
Nutrition Info: 317 calories
Prep Time: 1 hour
Cook time: 30 minutes
Total time: 1 hour, 30 minutes
Casserole Ingredients:
• Parmesan-Mushroom Cream Sauce (see instructions below)
• Seasoned, Crispy-Fried Onions (see instructions below)
• 2 lbs. (32 oz) Haricots Verts (thin, French green beans), cut into 1” pieces
• ½ cup grated Parmesan cheese
• 1 teaspoon fresh thyme leaves, for garnish
Parmesan-Mushroom Cream Sauce Ingredients:
• 2 tablespoons olive oil
• 8 oz. crimini mushrooms, sliced
• ¾ teaspoon black pepper, plus a pinch, divided use
• ½ teaspoon salt, plus a pinch, divided use
• 3 cups milk
• 2 cups half and half
• 2 cloves garlic, pressed through garlic press
• 1 tablespoon all-natural chicken base (I use “Better Than Bouillon” low-sodium)
• 1 ½ teaspoon Italian seasoning
• 4 ½ tablespoons butter
• 8 ½ tablespoons all-purpose flour
• ¾ cup grated Parmesan cheese
• 1 teaspoon soy sauce
• Pinch nutmeg
• 1 teaspoon fresh thyme leaves
Seasoned, Crispy-Fried Onions Ingredients:
• Vegetable or peanut oil for frying (about 3-4 cups)
• 1 large yellow onion, quartered and sliced as thinly as possible
• 1 ¼ teaspoon salt, divided use
• ¾ cup all-purpose flour
• 1 teaspoon cracked black pepper
• 1 teaspoon paprika
-Begin by preparing the Parmesan-Mushroom Cream Sauce (see instructions below), and set it aside to cool. (If doing ahead, prepare the sauce and cool it completely, then cover with plastic wrap and place into the fridge to keep until ready to assemble for baking.)
-Prepare the Seasoned, Crispy-Fried Onions (see instructions below), and place them into a paper-towel lined dish to hold. (If doing ahead, just prepare and allow them to cool, then add them into a paper towel-lined ziplock bag kept at room temp until ready to assemble for baking.)
-To cook the cut green beans, place a large pot filled with water over high heat; add enough salt to the water so that it tastes like the ocean (this will help season the green beans), and bring the water to the boil.
-Once the water boils, add in the cut green beans, and simmer them for about 6 minutes, or until crisp tender.
-Once cooked, drain them in a colander, and immediately plunge them into an ice water bath to stop them from further cooking; drain them once again, and place them into a bowl lined with paper towel to dry them as much as possible. (If doing the recipe ahead, you can at this point put the green beans into a container lined with a little paper towel, cover them with plastic wrap or a top, and keep in the fridge until ready to assemble for baking.)
-To prepare the dish, preheat the oven to 350 degrees, and prepare a large baking/casserole dish by lightly buttering it.
-To assemble, add the cooked green beans into a large bowl.
-Next, add the Parmesan-Mushroom cream sauce to the green beans, along with about ⅓ of the Seasoned, Crispy-Fried Onions, and toss gently to combine.
-Turn the green bean mixture out into the buttered baking/casserole dish, sprinkle over the top the ½ cup of grated Parmesan cheese, and place the dish into the oven to bake for about 30 minutes, until bubbly and warmed through.
-After the 30 minutes, remove the casserole from the oven, sprinkle on the remainder of the Seasoned, Crispy-Fried Onions, and place back into the oven for another 5 minutes to crisp up the onions a little more; finish by sprinkling the fresh thyme leaves over top, and serve while hot.
Parmesan-Mushroom Cream Sauce Preparation:
-Place a medium-large, non-stick pot over medium-high heat, and add the olive oil.
-Once the oil is hot, add in the sliced mushrooms, the pinch of salt and pinch of black pepper, and saute for a few minutes until the mushrooms are golden-brown; remove the mushrooms from the pot and place into a small bowl, reserving them for a few minutes; also, reserve this pot as you will use it to prepare the cream sauce in, in a moment.
-Into another large pot, add the milk, the half and half, the remaining ¾ teaspoon of black pepper, the remaining ½ teaspoon of salt, the garlic, the chicken base and the Italian seasoning, and whisk gently to combine; place this pot onto medium-high heat, and allow the milk mixture to come to a gentle simmer; once simmered, turn off the heat.
-Next, place the first medium-large, non-stick pot that you sauteed the mushrooms in, back onto medium-low heat; add in the butter, and once the butter is melted, sprinkle in the flour and stir the two together to form a “roux”, or your thickening agent for the sauce; cook the “roux” for only about 30-45 seconds, just long enough to cook out the raw taste (you want the color to remain very pale), and then slowly begin adding the hot milk mixture into the “roux”, whisking all the while to prevent lumps from forming.
-Once all of the milk mixture is added in, continue to gently whisk the sauce for a moment to ensure that it is well combined, and allow it to gently simmer for another 2 minutes to thicken up a bit.
-After the sauce has slightly thickened, turn off the heat, and finish the sauce by adding back in the reserved sauteed mushrooms, the grated Parmesan cheese, the soy sauce, the pinch of nutmeg and the fresh thyme leaves, and stir to combine (at this point, you can either leave the sauce as is with the slices of sauteed mushroom, or puree it using a hand-held immersion blender, which I did).
-Next, pour the sauce into a clean bowl/container, and set aside to allow to cool (completely cool, if making ahead), until ready to assemble the dish.
Crispy-Fried Onions Preparation:
-Add the vegetable oil to a medium-large pot, and place it over medium heat to slowly bring up to 350 degrees (it's best to use a clip-on thermometer, if you have one).
-While the oil slowly heats up, add the sliced onion into a bowl, and add a ¼ teaspoon of the salt, and toss to coat.
-Next, into a large ziplock bag, add the flour, the remaining 1 teaspoon of salt, the cracked black pepper and the paprika, and toss to combine.
-Now, add in the sliced onions, close the ziplock bag up, and toss the onion slices in the seasoned flour until very well coated.
-Next, remove the onions, gently shaking off any excess flour from them, and place them back into their bowl to hold until the oil is hot for frying.
-Once the oil reaches 350 degrees, take about ⅓ of the flour-coated onion slices and begin frying them (you'll work in 3 batches), gently stirring occasionally to move them around in the hot oil, for a few minutes or until golden brown; remove from oil and drain the crispy onions on a paper towel-lined platter/bowl; repeat until all onion slices are fried, then set them aside and allow them to cool until ready to use in assembly of dish. (If making ahead, store them at room temp in a paper-towel lined ziplock bag.)
Interested in another green bean recipe? Try this one: Buttery French Green Beans with Garlic Mushrooms
Cook’s Note: This post was originally published in 2012, and has been updated with even more love!


Peggy
The green bean casserole is always my favorite part of Thanksgiving. I made it sans-can a few years ago, and have been making it that way ever since! Definitely will have to try this succulent version too =)
The Cozy Apron
Peggy, that's great - and I promise you, you won't be sorry!
Tracy
My daughter-in-law has been making this recipe for a few years now and none of her family of six will eat mushrooms at all. Never, not even on pizza. And when she had completed this casserole the 1st year she tried it, it was gone at the end of dinner. It's so delicious and so full of flavor, it's unbelievable. Thank you so much for the natural way to prepare this without that nasty canned mushroom soup.
The Cozy Apron
Thank you, Tracy! I'm so, so honored that the family enjoyed this from-scratch version of green bean casserole...mushrooms and all! 🙂
Thanks for taking some time to let me know this recipe has been on your family menu for a few years now. It makes my heart happy to know that others are taking as much pleasure in enjoying it as much as my family does!
Jenny
Not celebrating Thanksgiving, I've never heard of this dish before - but it sounds amazing!
The Cozy Apron
Hi Jenny, truth be told, I'd make this dish whether it was T-Day or not, it's that tasty.
Gini
Can you use something else besides chicken stock? Im cooking for some vegetarians!
The Cozy Apron
Hi Gini, absolutely! The brand that I mentioned that I use also makes a delicious, all-natural "no-chicken" base, as well as veggie base. Just sub out a veggie stock, and you're great to go!
Bridget
It is my first Thanksgiving as a married lady and we are hosting my in-laws. My parents are out of town for the holiday and so it is my first time really cooking by myself for my husband's family. I can not wait to make this recipe! I just know I will impress my mother-in-law...as long as I pull it off!!
The Cozy Apron
You'll pull it off beautifully, Bridget! Just add lots of love, and you can't go wrong.
selle
HI!
I made these last night for an early celebration for Thanksgiving and it turned out fantastic!!
The Cozy Apron
Hi Selle, so thrilled that you tried this out and enjoyed the recipe! Hard to beat homemade, isn't it?
kathryn
hi! this looks absolutely fabulous and i've basically been chomping at the bit to make it for thursday! just wondering, how big of a casserole dish do you think i'd need, in terms of size? would 2 quarts be enough?
i'll report back on my results! haha (:
The Cozy Apron
Hi Kathryn, that sounds about right - I used a baking dish that was about 12x9x2. What I would say is that I'd always rather go bigger than not big enough, if you're not sure; better to have a little room at the top than not enough room and spillage! I truly hope you enjoy this dish, and have a Happy Thanksgiving!
Stephanie
I am so excited for this! I looked at several sans cans recipes, but this one is the winner. Thanks for sharing! I hope the non-foody in-laws appreciate it. If not, I know I will :0)
The Cozy Apron
Hi Stephanie, so glad this'll be your recipe choice! I know you'll thoroughly enjoy this, and rest assured that this casserole has even more "oomph" and savor than even the canned version (I made sure of it), so I think even your non-foodie in-laws will have happy bellies. Happy Thanksgiving!
Noreen
I made this for Thanksgiving and it was a HIT! Delicious recipe and well worth the little bit of extra work...though it was easy to make ahead and then just warm up. Thank you!
The Cozy Apron
Thank you so much for coming back to share with me your experience with the recipe, Noreen - so glad it was a hit! Also, it's good that you took the tip about making it ahead; it makes a difference, doesn't it?
crystal
Glad you posted this. We are gluten free and I am planning to make my own french fried onions for my casserole for christmas day. I persoanlly think this is what makes thanksgiving and christmas food more special....it's lil extra work and a big pay off.
The Cozy Apron
Hi Crystal, so very eloquently put. I truly hope you all enjoy this recipe - Merry Christmas to you and your family!
Christine Hart
A silly question.. does this taste like the original "can" recipe? I have a large family, and they are usually hesitant to try anything "new" especially around the holidays! Thanks!
The Cozy Apron
Hi Christine, I love your question, because it's a really honest one! 🙂 All I can tell you is that my husband and I love the flavor of this from-scratch version much more than the canned - and he'd been making the canned for years in the past. In my opinion, you just can't beat the intense flavors of fresh ingredients and good seasoning. So though you know your family best, I feel absolutely confident that the taste of this side dish is scrumptious. And hey, perhaps you could just serve it without mentioning that it's a little different or "new" - wait until after they eat it to share that!
Sheryl
This looked so great, I am doing this year. Making all the seperate components today (day before Thanksgiving) and I will finish it off tomorrow. The sauce is fantastic....can't wait to bake it off tomorrow. As to any comments about it being too time consuming, well good things take time!
The Cozy Apron
Hi Sheryl! I absolutely loved the last line of your comment, and am glad that you, as a reader (and preparer of the recipe), said that! There definitely is a difference in taste/texture with this homemade version. And the fact that you're making the components ahead of time is really ideal. Hope you and your family enjoy this recipe tomorrow, and please have a wonderful, joyous and delicious Thanksgiving!!
Rebecca
I'm trying this out this afternoon for our big Christmas feast tonight and I am soooo excited! I'll report back how it turned out 🙂
Kirstin
I made this for Thanksgiving and it was a HUGE hit, even amongst those who don't like green bean casserole. it was hard not to eat all the onions before they made it to the casserole and I've used the mushroom sauce in my tuna casserole and it sure kicked it up a notch! I'm sharing about it on my blog today. I am linking back to your blog and this recipe. I really enjoy your blog.
The Cozy Apron
Well thanks for that, Kirstin - I appreciate it! Glad to read that even the not-so-big-fans of green bean casserole enjoyed it, and that the sauce has been of good use in other dishes! Thank you for your kind comments and readership.
Katie
May I use the French's already prepared friend onions instead?
The Cozy Apron
Katie, you sure can! The recipe for the crispy onions is there, more or less, to keep this completely "can-free" and from-scratch; but if it helps out for time purposes, by all means, use the prepared ones. 🙂
Jaimie
Since making this dish a few turkey days ago, it's become a staple. A huge hit the first year with requests to bring it back year after year. My sisters now take it to their holidays on the years we aren't all together. It was difficult to find haricots verts that didn't cost a ton, but Costco came to the rescue. I saved myself some time and used the trader joes fried onions-delish and much less labor intensive. This is a wonderful recipe that isn't too difficult to prepare-even on the holiday. Being a few days away, im about to go get my ingredients tomorrow to make the sauce and store it for an easy and delicious casserole for thanksgiving. Thanks for such an amazing recipe. Coming from a family of foodies, it's a HUGE compliment that everyone loves it and wants the recipe!
The Cozy Apron
Hi Jaimie, I love that! Thanks so much for sharing with me. Hope all of you foodies enjoy it again, this year! Happy cooking. 🙂
Kelly Foster
I made this recipe for Thanksgiving 2016 and everyone loved it! I've never enjoyed a green bean casserole before eating this one. I followed the directions exactly except I didn't add any fresh thyme and I cooked it at 425 degrees since I already had something else in the oven at that temperature. It still came out great! I made it all ahead of time and cooked it right before dinner. It took a bit of effort to do everything from scratch but the results are SO worth it. Thank you Ingrid! This one's a keeper!
The Cozy Apron
Kelly, I love it when someone decides to try their hand at something new, and they end up enjoying it! So happy that the recipe was a hit for you, and that it'll be one that you may return to every now and again! Thanks so much for taking a moment to share your experience with me!
Kim
I made this for my 2017 Christmas meal and it is Green Bean Casserole PERFECTION !
The Cozy Apron
Kim, that’s great! So happy to read that! Glad you enjoyed.
susan tessner
Can this be made in a crockpot?
The Cozy Apron
Hi Susan, I have not prepared it in that way, and wouldn't personally recommend it. The sauce needs to be done by hand, and then everything is simply combining & baked.
Shannon M. Kline
I have made this dish for the past 3 Thanksgivings and it's always a favorite, now a staple. I was wondering if the onion rings could be prepared in an air fryer, and if so if you knew at what temperature and for how long? I think this would help with prep time.
The Cozy Apron
Shannon, you've made my little heart sing to know that this recipe has been a part of your Thanksgiving for the past 3 years now—wow!
Boy, I wish I could advise on the air fryer method. Unfortunately, I don't have experience using one, so I can't really say; but honestly, if you're really looking to cut back on some of the prep and save time, then maybe just find a brand of organic, good quality crispy onions.
I know this is probably strange coming from me since I'm advocating making this recipe completely from scratch, lol...but if you're gonna choose something to "short cut" here, I'd short cut the crispy onions. 😉
(And if by chance you make them using your air fryer, I'd love to know the results!)
Hope you enjoy the casserole this year as much as you have in the past...happy cooking to you!
Sam W
So I feel guilty after all these years. I found this recipe back in 2012 (I think) and have made this recipe every thanksgiving since. It's the biggest hit everywhere I bring it, to family dinners, to office get-togethers and holiday parties.
This recipe is phenomenal. Heck, sometimes I will eat the leftover mushroom soup by itself its so good. Due to the pandemic as well, we're not doing a big get-together but I still had to make it if not for just myself. It's delicious. I love it.
Never again with the canned mushroom soup base. Yuck.
10/10.
The Cozy Apron
Hi Sam, your comment made my morning. Thank you so much for sharing all of that with me!
I'm thrilled you and your friends and loved ones have been enjoying this casserole for a number of years now. It is so very humbling to know that my recipe has been a part of your special gathering for a while now, and has made many people's bellies happy. This is the entire reason that I love to share my recipes! 🙂
May you enjoy it again this year, even though things are certainly very different. My hope is that at least some good food can bring us all some comfort!
Happy Thanksgiving, Sam. (PS. There's also an actual mushroom soup up on the site now, if you ever want to check that out!)