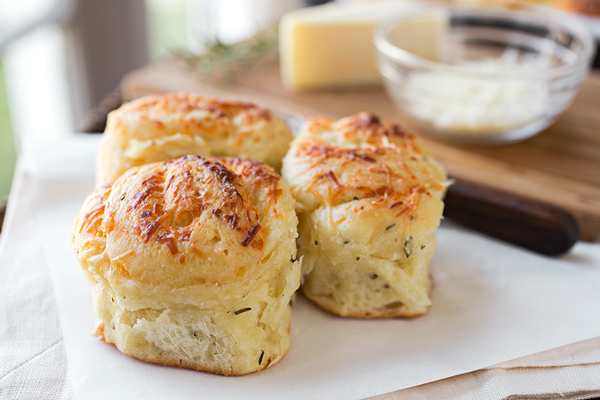
Freshly baked dinner rolls, kissed with a touch of rosemary and garlic butter, are scrumptious! They make your favorite meal extra special and extra cozy!
Dinner Rolls, Those Little Pillows of Deliciousness
For me, nothing quite beats warm, buttery and soft dinner rolls fresh out of the oven as an accompaniment to a delicious homemade meal. It's an utterly cozy and comforting treat!
As they bake, their glorious aroma fills the kitchen and then wonderfully wafts into every other room in the house. It's an aroma that speaks of home, of care, of nurture, and of the promise of good food prepared with an abundance of love.
When I created my recipe for my homemade dinner rolls a while back, I really wanted them to be a bit special.
I wanted my dinner rolls to be a bit of a treat, something that I would find myself craving and dreaming of. My goal was to create a recipe that would be a fun and creative culinary process to participate in when the desire for something homemade came along.
I also imagined them as one of those recipes that either my hubby or our son would put in a special request for from time to time, or one that I could bake up and bring along with me to a special gathering.
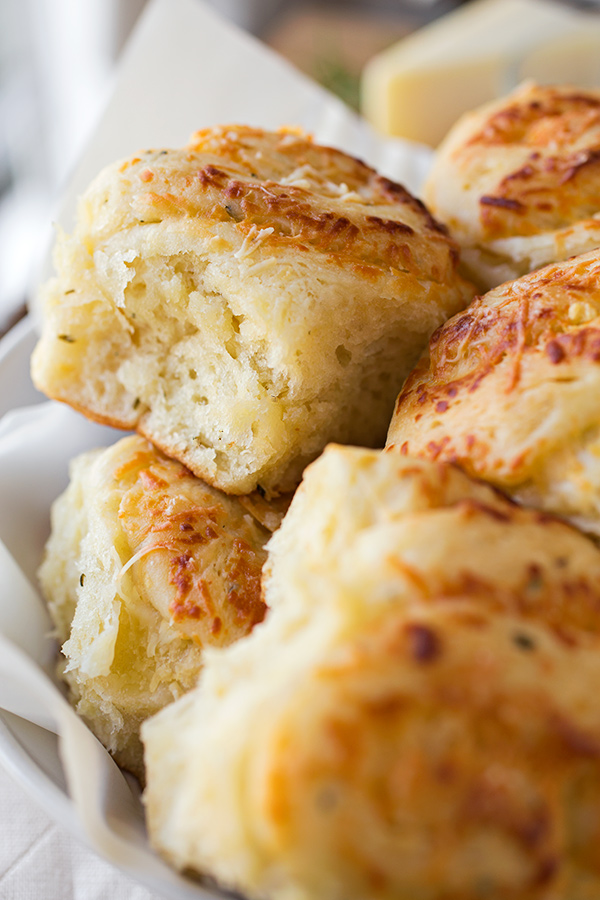
These soft and pillowy dinner rolls are most definitely such a recipe! They're prepared with lots of flavorful and aromatic ingredients, and an abundance of love and care, indeed!
Flavorful Homemade Dinner Rolls
While I can't recall the details of where or even when I had this, I remember at some point enjoying a focaccia-style bread that had been brushed with either butter or olive oil, and topped with fresh rosemary. They had a hint of garlic, a sprinkle of parmesan, and I recall thinking how exquisite the fragrance and taste was in combination with the flavor of the warm bread... (Come to think of it, was this all a splendid dream?)
And so when I came up with my dinner roll recipe, I wanted to include similar flavors to make them extra savory and unique.
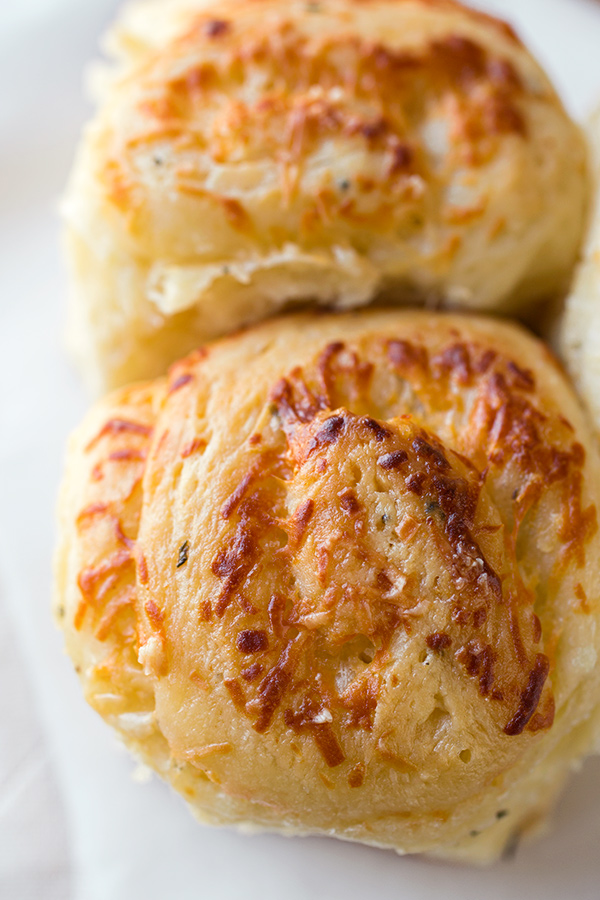
I use chopped, fresh rosemary leaves (which I add directly into the dough), melted butter, garlic, and asiago cheese. I've included a mashed potato in a yeasted dough to create a more fluffy, tender, and pillowy texture—nothing quite like it.
These ingredients create very fragrant and flavorful dinner rolls, the kind where enjoying just one has never been an option for me personally!
How to Make Dinner Rolls
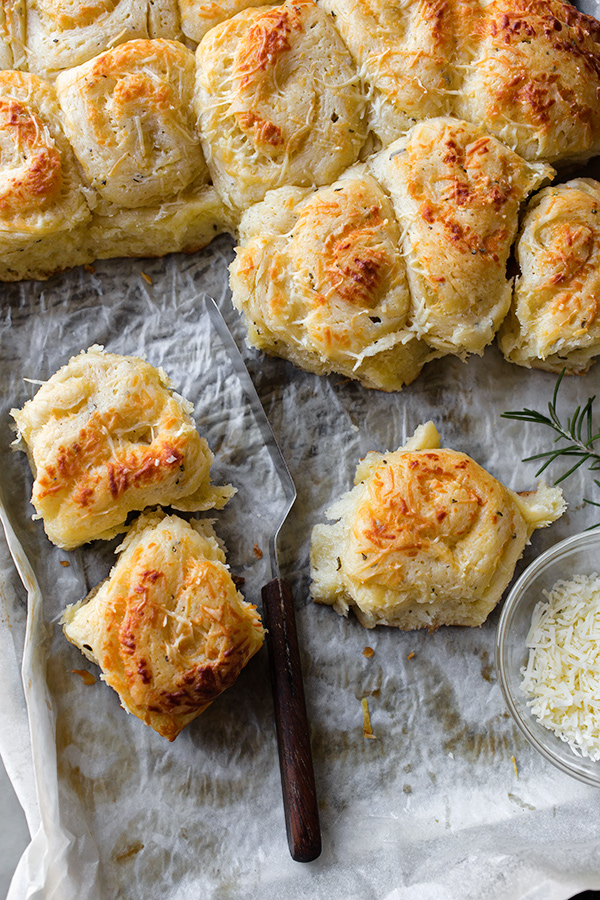
I make these dinner rolls in the style of a pin-wheel roll, or similar to how one would prepare cinnamon rolls. This creates a sort of “pull apart” style of roll, one where you simply pull a roll off from the rest of the batch.
Here's a glance at my dinner roll recipe:
- I prepare my yeasted dough, and allow it to proof for 1 hour and 20 minutes.
- While the dough gently rises, I prepare my garlic-butter filling.
- With my dough rolled out, I spread on my combination of melted butter and garlic; then, I sprinkle over some of my asiago cheese.
- I roll up the dough as I would cinnamon rolls, then cut small rolls (roughly 30), placing them on a large baking sheet, making sure they're snug; and then I proof the dough once more for 40-45 minutes.
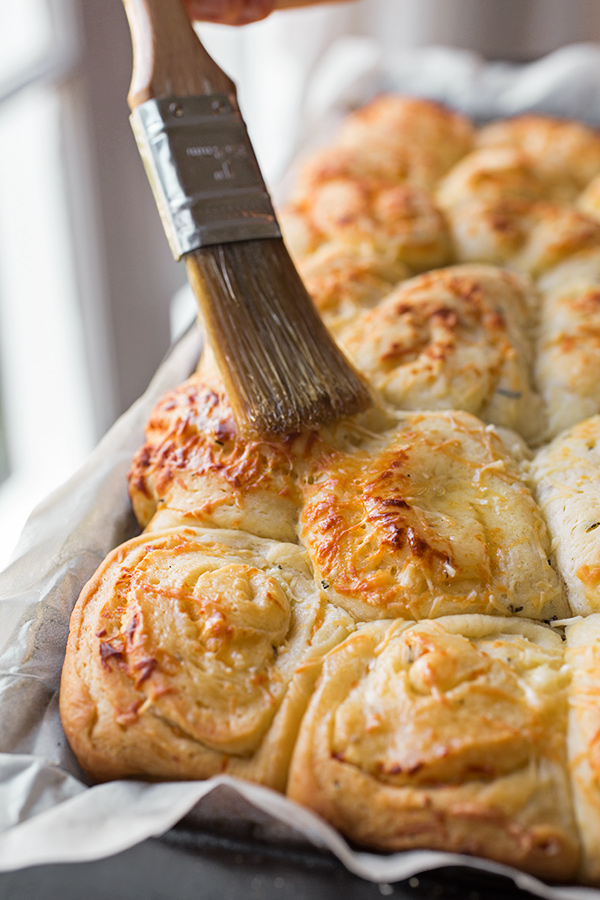
- Once proofed, I brush a bit more garlic butter on the rolls, then bake them for about 25 minutes, or until a light golden color.
- As a finish, I brush them once more with a touch of melted butter just before serving.
(You'll find the full recipe below...)
Let me tell you, these delicious dinner rolls are simply heavenly when they're soft and fresh from the oven!
Tips & Tidbits for Dinner Rolls:
- Mashed potato in the dough: The addition of mashed potato in the dough yields tender, fluffy and light dinner rolls. I simply place a russet potato into my microwave and cook it until tender for several minutes, then pass it through a ricer for a smooth texture.
- Fresh or dried rosemary: I love the color and the sharp fragrance of fresh rosemary in this dough; but if you prefer to use dried rosemary, that is fine too. (You could also use a combination of dried herbs such as the ones found in Italian seasoning.)
- Make things easy by making ahead: You can prepare these dinner rolls the day before you plan on serving them up to the point where you cut them into rolls, before the second proofing. Just place them onto the baking sheet, wrap well with plastic wrap, and keep in the fridge. When ready to bake, allow them to come to room temp and proof (about an hour or an hour and a half, or until they double in size), then proceed with baking.
- Flavorful cheese: Asiago is my pick for these rolls, as it is super flavorful yet soft enough to lightly melt/soften over the rolls and become golden. Another great option is parmesan cheese, or an Italian four-cheese blend.
- Brush with melted butter before serving: While these are still warm, brush them with any remaining melted butter you have left just before serving. They'll be extra aromatic!
Feast your eyes on these, or just jump to the recipe:

Recipe
Dinner Rolls
by Ingrid Beer

Category: Side
Cuisine: American
Yield: 30 rolls
Nutrition Info: 163 calories (per roll)
Prep Time: 2 hours 30 minutes (this includes dough “proofing” time)
Cook time: 25 minutes
Total time: 2 hours, 55 minutes
Dough Ingredients:
• ¼ cup warm water (110°)
• 1 teaspoon granulated sugar
• 1 (¼ ounce) packet active dry yeast
• 1 cup whole milk
• ½ cup unsalted butter
• ¼ cup granulated sugar
• 2 teaspoons salt
• ½ cup (slightly heaping) mashed potato
• 2 large eggs, beaten
• 4 ½ cups all-purpose flour, plus more for kneading
• 1 ½ tablespoons chopped, fresh rosemary leaves
Filling Ingredients:
• ¼ cup unsalted butter
• 3 cloves garlic, pressed through garlic press
• 2 ½ cups grated asiago cheese, divided use
-To prepare your dough: add the teaspoon of sugar to the warm water, and mix with a fork to dissolve; next, sprinkle the yeast over top in an even layer, and using the fork, gently mix to dissolve; allow the yeast mixture to sit for 8-10 minutes, until foamy.
-While the yeast activates, add the milk, the butter, the sugar and the salt to a small sauce pan, and gently heat the mixture until the butter is melted; whisk to blend, and allow to slightly cool.
-Next, add the milk/butter/sugar/salt mixture to a large bowl; add in the mashed potato and the eggs, and using a hand mixer, mix on low until well blended, about 1 minute.
-Then, add in 2 cups of the flour and the chopped rosemary leaves, and mix on low until smooth.
-Add in the yeast mixture, and mix that until well incorporated.
-Now, using a wooden spoon, add in the rest of the flour, and stir to combine until a “shaggy” dough is formed.
-Flour a work surface, and turn the dough out onto it; knead for about 6 minutes, adding a little more flour as needed, until the dough becomes smooth and elastic.
-Spray a large bowl with cooking spray, place the dough into the bowl, and cover with plastic wrap; place the dough into a warm place (I usually put mine the microwave, or into a very lightly “warmed” oven that has been turned off) and allow for it to double in size, about 1 hour 20 minutes.
-While the dough is rising, you can put together your filling: add the ¼ cup butter to a small, microwave-safe dish, and melt it; then, add in the pressed garlic, and stir with a fork to combine; cover with plastic wrap, and keep warm to keep it fluid (or you can reheat it in the microwave, if needed).
-Line a large baking sheet with parchment paper, and lightly mist it with cooking spray.
-Once the dough has doubled, punch it down, and turn it out onto a floured work surface.
-Roll the dough out into a rectangle shape, about ¼” thick (it will be fairly large); then, drizzle or brush onto the dough the “garlic butter”, reserving about 1 tablespoon of it to keep for brushing over the rolls before baking them.
-Next, sprinkle over 2 cups of the grated asiago cheese as evenly as possible, and starting from the top, carefully and as tightly as possible, roll the dough towards yourself, and pinch the seam closed.
-Next, cut the dough “log” in half for easier slicing of the rolls.
-Then, cut about ¾” - 1” rolls from each of the log halves (shaping each individual roll with your hands if they need to be made tighter), and place onto your prepared baking sheet; place the rolls tightly against each other.
-Next, cover the rolls with plastic wrap, and allow them to double in size, for about 40-45 minutes.
-During the last 15 minutes of proofing, preheat your oven to 350°.
-Brush the rolls very lightly with the remaining tablespoon of garlic butter, and sprinkle over the remaining ½ cup of asiago; bake for about 24-28 minutes, or until a pale golden color, and serve warm. (You can even brush a bit more butter over them before serving.)
Interested in more roll recipes? Check out this recipe for Buttery Sweet Potato Dinner Rolls, or these “Everything” Homemade Rolls!
Cook’s Note: This recipe was originally published in 2014, and has been updated with even more love!


Ellie Elliott
Found on Pinterest! These look so delicious! I will definitely try for Thanksgiving! Thanks for sharing!
The Cozy Apron
Hi Ellie, so excited to read that! And may you and your loved ones enjoy these, and have a wonderful Thanksgiving Day!
Narci
Just found this recipe now and am about to put them in the oven can't wait to taste em they they already smell so good thank you
The Cozy Apron
Hope you enjoyed, Narci!
Sarah@WholeandHeavenlyOven
Oh my gosh, I am SUCH a sucker for anything yeast bread, but with rosemary, garlic and all that cheesy goodness?! I think I just want these rolls for Thanksgiving dinner. 😀 Pinning!
The Cozy Apron
Thanks, Sarah!
Farah @ The Cooking Jar
Oh my god, I can practically taste this! Much drooling on this side of the web, especially with the cheese. Pinning this onto my board so I can make it later!
The Cozy Apron
I do hope you try these, Farah!
Daisha
I'm looking forward to making these rolls for a potluck dinner, but I only have fast acting yeast. Will I have issues using this type of yeast opposed to regular yeast? I know that I can skip the proofing step with instant yeast.
The Cozy Apron
Hi Daisha! In all honesty, I don't use fast acting yeast, so I'm a bit leery to say in what way using it would affect the recipe/rolls. If you do have experience with it, and know that you can skip the proofing step, then I'd just go ahead and try the recipe, moving on to the next step. 🙂
Gergana Petersen
Thank you so much for sharing this recipe! I tried it today and it turned out just as great as expected!
The Cozy Apron
Gergana, that's wonderful! So glad you enjoyed the recipe!
anna
These turned out beautifully and so soft, have you considered/do you think the base of the dough would work to make cinnamon buns?
The Cozy Apron
Hi Anna! So glad these turned out so wonderfully for you! And you want to know something? This dough IS actually the base for my cinnamon rolls, lol! 😉 You can "search" on the site for cinnamon rolls, and will find some really tasty recipes! (I believe we have 3 "sweet" rolls recipes—a "blueberry-lemon", a "caramel apple", and a "Christmas Morning" one.) Hope you check 'em out!
ann
Hi - these look perfect for Thanksgiving and will be my first try at making yeast rolls. Being new at this I was wondering if any of this process can be done ahead and then the rolls baked right before dinner? Thanks in advance.
The Cozy Apron
Hi Ann, yes—you can go to the point where you make the rolls and place them on a baking sheet, but instead of letting them rise for the 45 minutes, cover them/wrap them well in plastic wrap, and place into the fridge (up to a day before). Then, when ready to bake, take the rolls out and allow them to warm up, about an hour and half before baking, then bake as directed. Best wishes on your baking! Hope you enjoy.
Ann
thanks - can't wait to give them a try.
Alice May Matulevich
I am very excited about your recipes, I would like very much to make these wonderful dinner rolls. I am going to Atlanta to visit my son for Thanksgiving, I will probably have to make them ahead and bake them. Unless you have any other suggestions. Thank you so much!
The Cozy Apron
Alice, that may be the best bet. If you can somehow keep them airtight, that would REALLY help, since these homemade rolls are best fresh out of the oven and still the next day, but too far in advance won't be too good as they'll begin to stale. Too bad you can't freeze at the point where they are cut into the rolls prior to the second proofing, or "rising"; then they could be completely defrosted and allowed to puff up a bit before baking. But either way, I hope you all enjoy these!
Katherine
Would love to know if you can make a day ahead any part or the whole thing? Or do you need to make it same day and eat right after?
The Cozy Apron
Hi Katherine! You can make a day ahead up to the point where you cut the dough "log" into individual rolls, and before the second "proofing"; place the cut rolls onto a parchment-lined baking sheet, wrap very well with plastic wrap, and keep in fridge until a couple of hours before you are ready to bake them; then, you will want them to come to room temp and begin to rise and proof for that second time. After that, just bake.
Beth Rowe
I am going to a friendsgiving and wasn't sure what I wanted to make. After looking around on Pinterest I found these rolls and knew this is what I wanted to make. I made them a few nights before just to make sure I could make them. They were AWESOME! I am so adding them to my list of sides to make.
The Cozy Apron
Hi Beth! I'm glad you found these, too! I'm thrilled you enjoyed them, and that they will be added to your "sides" list. Thanks so much for sharing your experience with me!
Arlene
Hi, If I'm taking them to a dinner party, should I cook them half of the way and finish cooking them when I arrive at the party or should I cook them completely through and heat them up when I get there?
The Cozy Apron
Hi Arlene! I would bake them completely at your own home for ease, and then take them over to the party and reheat gently, as they are best served warm. Even a little time in a low-heat oven (residual heat, even) will do the trick. Hope you enjoy!
Kristina
Made these this evening and they were exceptional! I used a sweet potato as it was what was on hand, and I did have to add about a cup and a half of additional flour/double my kneading time, plus extra time for rising. I also cut the batch in half after the first rise and did some with extra garlic/no cheese for picky eaters. As a finishing touch I sprinkled some table salt over the garlic spread step, and it really took these over the top. Rave reviews all around the table and I will certainly be saving this recipe for the future. Thanks so much!!
The Cozy Apron
Kristina, that is awesome! So glad you you all enjoyed! (And by the way, I've got to share a recipe with you: https://thecozyapron.com/sweet-potato-dinner-rolls/ )
These were a version of a dinner roll I did using a sweet potato, as well, so I thought I'd pass this along to you, too! Thanks so much for sharing with me.
Heather Jackson
Made this for my potluck at college. Let's just say that I didn't make enough. Lol
The Cozy Apron
Hi Heather! Somehow, there's never enough of these made, lol...they're so soft and pillowy, and it's hard to eat just one! So glad they were a hit for you...thanks for sharing!
Allen Jacob
I have not tried your recipe but I love the photography and am glad you and your husband have a shared passion!
The Cozy Apron
Hi Allen, your comment was so touching to both my husband and I— thank you so much for such a kind acknowledgement! So glad to have you stop by, and I do hope you give some of our recipes a try. I think you'll enjoy them! Happy cooking!
Yogesh
Yumm
JB
These are excellent!! I made them and froze what didn’t get eaten. We’ve loved being able to pull out just a few and heat them about 10 minutes in the oven. Taste just as they did fresh baked.
The Cozy Apron
Hi JB, that is fantastic!
So glad they were such a success for you, and what a great way to make them stretch a while longer! Yes, whenever I freeze my own baking or a fresh loaf of bread from the market, it always stays nice and fresh like it was just made.
I really appreciate you sharing the tips with others here in case they, too, would like to stretch their own batch. 🙂
Pamela
Has anyone added more seasonings - like basil or oregano to it? And/or sprinkled grated parmesan on top? I've made these the last 2 years for Thanksgiving and plan to do it again, but wondering if I should add more flavor...
The Cozy Apron
Hi Pamela, glad you've been enjoying these rolls the past couple of years! You could absolutely sprinkle in more of what you'd like. Basil/oregano would be great, even adding more cheese, or some parmesan, would be tasty. Use your imagination...and your palate!
Chelsea
I’m going to be making these this weekend to test out for my family’s Easter gathering in a couple weeks. (To make sure I know how to actually do all of it lol)
Very excited!! Your recipe looks PHENOMENAL!
For the mashed potato, do you think plain mashed potato flakes with a bit of water to hydrate them would work well instead of using a whole potato and mashing it?
I feel like the concern there would be to just get the right consistency.
The Cozy Apron
Hi Chelsea, I'm not certain about using the potato flakes, as I have not tried that method, but feel free to experiment if you're preparing ahead of time as a bit of a "trial". Hope you and your loved ones enjoy the rolls for Easter! 🙂