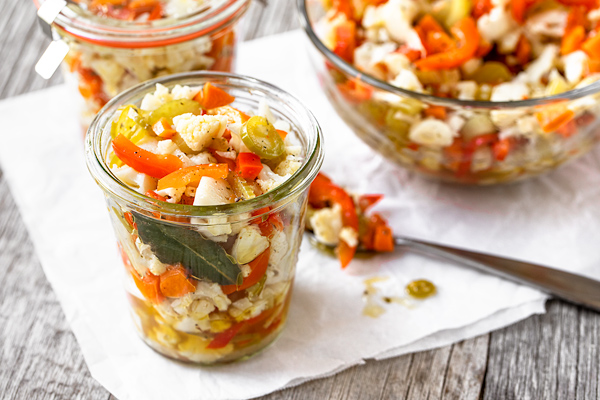
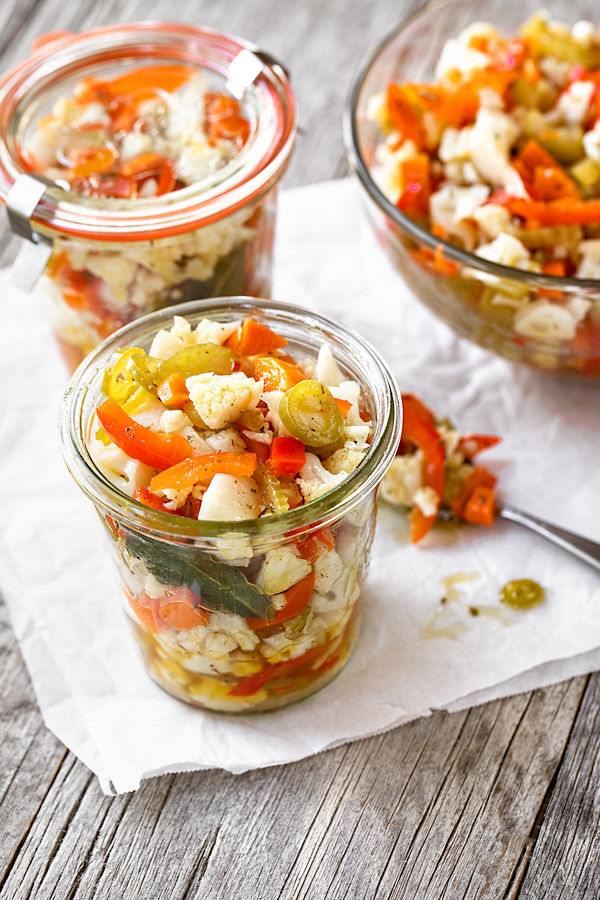
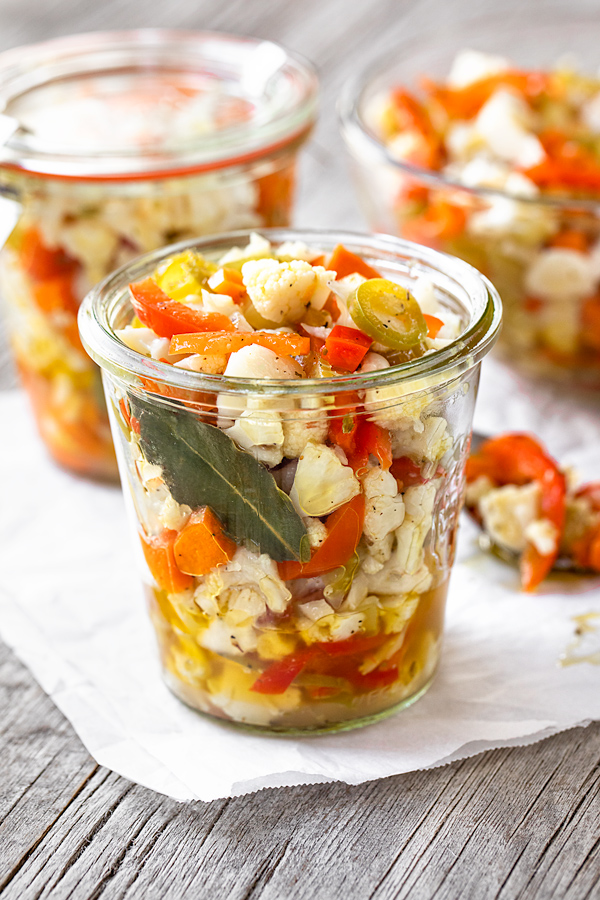
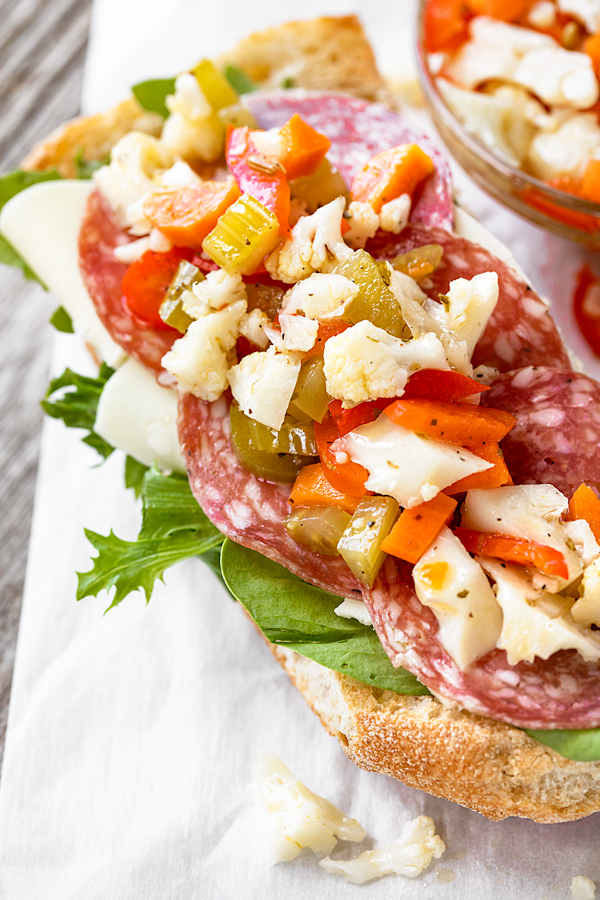
Giardiniera is a deliciously fresh and savory Italian condiment that's absolutely exquisite spooned atop of sandwiches, pizza, hot dogs and burgers, or even eaten as a little side salad accompaniment. Prepared with quickly pickled and marinated finely diced fresh cauliflower, carrots, sweet red pepper, celery and thinly sliced Serrano peppers for heat, my giardiniera recipe has lots of bright flavor, and is a must-have condiment to keep on hand in the fridge!
The Delicious Italian Condiment That Makes Everything Zestier
If you take a little peek into my fridge, you will find a few mason jars of homemade giardiniera (easiest way to pronounce it: "jar-din-air-ah"), one of our favorite pickled condiments these days.
Ever since preparing a batch of this bright and zippy giardiniera a couple of months ago, I've been keeping us restocked as we've been happily devouring the stuff on pretty much everything from sandwiches, to pizza, to hot dogs, to healthy wraps.
We even love the giardiniera spooned atop of salads or served in a small side ramekin as a tangy, healthy aid-to-digestion similar to that of sauerkraut!
My hubby and I utterly adore giardiniera, and nothing quite beats one prepared from scratch using fresh, organic vegetables and the perfect mix of seasonings and herbs, marinaded in a good quality olive oil to keeps things steeped in bright, zesty flavor.
Considering how fun and how easy it is to prepare our own fresh batches of giardiniera, I can't imagine not having some tucked away in our fridge to have on the ready for brightening up our favorite foods, or to simply enjoy as a healthy and refreshingly crisp condiment!
How to Make Giardiniera
When it comes to giardiniera, there are basically two kinds: the Italian-style giardiniera and the Chicago “hot” giardiniera.
My recipe here is for the Italian-style giardiniera, because this version tends to favor using a quick pickle in a vinegar brine, while the Chicago version typically uses little to no vinegar, rather using an olive oil (or mixed oil) base as a marinade.
The common veggies used in giardiniera recipe are fresh cauliflower, carrots, celery, and red bell peppers. Typically, some kind of spicy chili is used as well (such as the Serrano chili, jalapeno, or even pepperoncini), and everything is diced quite small to create a chunky, spoonable, relish-like texture.
The Italian-style giardiniera also calls for a quick simmer in a flavorful vinegar brine to pickle the veggies and take away some of their raw crunchiness, preparing them for the flavorful marinade to follow.
While there is some preparation in the way of chopping/cutting, the process of preparing homemade giardiniera is actually quite quick and easy.
Before you know it, you've got a couple of mason jars ready to keep on hand to add zip and zest to all your favorite foods!
Here's a sneak peek at my giardiniera recipe: (or just jump to the full recipe...)
- To begin, I prep the veggies by chopping/slicing them into small bits and slices, setting each aside in separate little bowls.
- I whisk together the flavorful ingredients for my brine to simmer the veggies in, then bring that to a boil; then, I add in my cauliflower and carrots, gently simmering those for 3 to 4 minutes.
- Next, I add in the celery and red bell pepper, and gently simmer those for 2 to 3 minutes.
- When the simmering is done, I turn the heat off under my pot, add in my thinly sliced Serrano chilis, and allow all the veggies to steep in this brine for 5 minutes. I reserve a portion of the brine to use for my marinade.
- To prepare my marinade, I whisk together my reserved brine with my other marinade ingredients in a medium-large bowl, and set it aside for a moment.
- I drain my brined veggies very well, then add the warm veggies to my marinade and toss with a spoon to completely coat them (adding more salt/pepper if needed).
- The giardiniera is covered and placed into the fridge overnight, and mixed occasionally; then, the next day, I spoon it into jars with tight fitting lids for storage, and enjoy as desired for up to 2 weeks.
Recipe
Giardiniera
by Ingrid Beer

Category: Condiment
Cuisine: Italian
Yield: 1 quart (or 4 cups)
Nutrition Info: 105 calories (per ¼ cup)
Prep Time: 20 minutes
Cook time: 5 minutes
Total time: 25 minutes
Giardiniera Ingredients:
- 2 cups water
- 1 cup white wine vinegar
- 2 small bay leaves, or 1 large
- 2 ½ tablespoons salt
- 1 tablespoon sugar
- 1 pound cauliflower (½ of a head), diced into tiny florets (about 4 heaping cups)
- 2 medium carrots, peeled and sliced (or diced) small
- 2 ribs celery, sliced (or diced) small
- 1 large red bell pepper, cored and seeded, and sliced thinly into short strips
- 1 to 2 Serrano chilis (optional), sliced thinly
Marinade Ingredients:
- ½ cup olive oil
- ¼ cup neutral oil (vegetable, soybean, safflower, etc)
- 1 whole garlic clove, smashed
- 1 teaspoon dried oregano
- ½ teaspoon fennel seeds
- Pinch red pepper flakes (optional)
- Pinch black pepper
- 6 tablespoons reserved brining liquid
- Into a medium-size non-reactive pot, add the water, the white wine vinegar, the bay leaf, salt and sugar, and whisk to blend; place over medium-high heat, and once this brining liquid has come to the boil, add the cauliflower and carrots, allowing them to gently simmer for 3 to 4 minutes.
- Next, add in the celery and red bell pepper, and simmer for another 2 to 3 minutes; then turn off the heat and add in the sliced Serrano chili(s), and allow the veggies to sit in the brine for 5 minutes.
- Reserve 6 tablespoons of the vinegary brining liquid, and set aside for your marinade.
- While the mixture sits, prepare your marinade: to a large bowl add both of your oils, along with the smashed garlic clove, oregano, fennel seeds, red pepper flakes (if using), some black pepper, and the 6 tablespoons of reserved brining liquid; whisk these ingredients together to blend well.
- After the vegetables have sat in their brining liquid for 5 minutes, drain them thoroughly, and add the warm vegetables directly into the marinade.
- Using a spatula or large spoon, gently mix the vegetables into the marinade to coat them well, and allow things to sit at room temp to cool for about 20-25 minutes.
- Next, have a small taste of the giardiniera to see if additional salt is needed (I typically do add a pinch or two more), then place into the fridge to cool completely; then, cover with plastic wrap and marinate overnight, mixing occasionally.
- The next day, enjoy the giardiniera straight out of the bowl, or spoon it into glass storage jar(s) with tight-fitting lids, and keep in the fridge for up to 2 weeks. (If you see that the marinade becomes firm in the cold fridge, allow the giardiniera to sit at room temp for 20 minutes to liquify it once more.)
Tips & Tidbits for my Giardiniera:
- Perfect veggies for giardiniera: Finely diced cauliflower, carrots, celery and red bell peppers offer a wonderful array of not only crunchy texture, but also sweet and savory flavor. They also keep well in the marinade after brining, and maintain that fresh, crisp texture.
- Vinegar for a tasty brine: Since I'm not the biggest fan of plain white vinegar in general (it's too sharp for me), I love the milder flavor of white wine vinegar here for this Italian giardiniera recipe. If you don't have that, feel free to use the regular white vinegar, or even rice vinegar, in a pinch. (You could use red wine vinegar, but keep in mind that it will add a pinkish/reddish hue to the vegetables.)
- Make your giardiniera hot and spicy: Because I do tend to appreciate some heat when it comes to this recipe, I typically will add 2 Serrano chilis, thinly sliced. I even add a small pinch of red pepper flakes, but these are optional. If you don't care for any heat in your giardiniera, then feel free to leave the Serranos out.
- Marinate overnight in a bowl before jarring: I like to keep my freshly-prepared giardiniera in a covered bowl, in the fridge overnight, before spooning it into jars, in order to be able to give things a mix every so often for even marination. Then, the next day, I spoon everything (including the marinade) into my Weck's (or mason) jars with lids, and keep in my fridge.
- Leave at room temp, to soften the marinade: When the giardiniera is cold out of the fridge, the olive oil in the marinade tends to solidify a bit. So I’ll typically take it out of the fridge about 20 minutes or so before I plan on enjoying some, to allow the oil to liquify once more. Or, I let it sit in a bowl of warm water to expedite the process.
- How long to keep homemade giardiniera: I've seen it suggested that keeping homemade giardiniera for up to 1 week in the fridge is a good time frame; but honestly, we've had no issue keeping it for up to 2 weeks. Since it's in a vinegar and oil marinade, it stays fresh for a reasonable amount of time.

Craving some more scrumptious condiment recipes? Check out this Chimichurri Sauce, this Blue Cheese Dressing, or this fresh Mango Salsa!


Leave a Reply