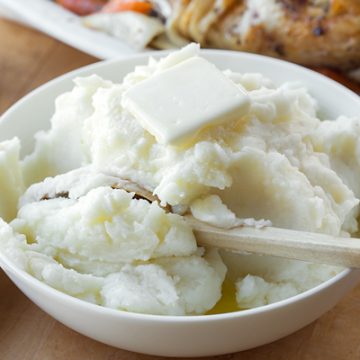
Healthy and vibrant, mashed butternut squash makes for a colorful alternative to classic mashed potatoes with its mildly sweet flavor and silky texture. Prepared with the rich, nutty addition of browned butter, sage and roasted garlic, my mashed butternut squash recipe makes for a scrumptious side for your fall table!

A Mash Of A Different Sort
When I was a kid, my mom used to make a delicious mash out of rutabaga, a unique, golden-purple root vegetable that resembles a turnip, with a mildly similar flavor.
She would prepare it in place of mashed potatoes from time to time by peeling, boiling and mashing it, then adding in a good bit of butter, salt, and a hint of black pepper.
I remember how that delicious root vegetable concoction used to melt in my mouth, and I loved it!
Just goes to show that a unique and scrumptious “mash” can be prepared with something other than the usual spuds...
Take butternut squash, for example. I use it often in my cooking to prepare rich, velvety soups, colorful lasagnas, hearty salads, and even a hot and cheesy dip!
And because of its velvety texture, it also happens to be a fantastic pick to mash up and serve as part of a lovely autumn spread in place of the usual mashed potatoes, with a hint of rich, nutty brown butter, sage, and sweet-savory roasted garlic for added earthiness!

My Mashed Butternut Squash Recipe with Brown Butter
My recipe for mashed butternut squash is filled to the brim with earthy, complex flavors, and is actually quite simple to prepare in just a few steps.
Roasting butternut squash on a baking sheet (along with a couple of heads of garlic) adds a nice layer of sweetness as the sugars in the squash caramelize a bit, while softening the flesh and creating some added golden-brown color.
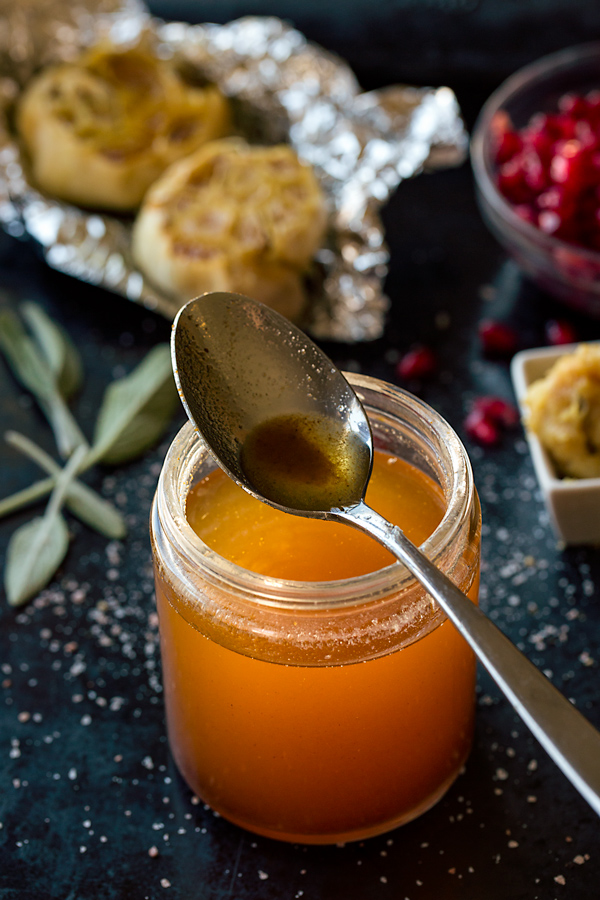
And browning butter takes only a few moments to prepare as well, and this is the little “secret” ingredient that provides that nutty, buttery flavor that's so irresistible!
Here's a peek at my mashed butternut squash recipe: (or just jump to the full recipe...)
- To get started, I prep my garlic heads for roasting, then place them onto a large baking sheet lined with foil.
- After roasting the garlic for 15 minutes, I add my seasoned butternut squash cubes to the baking sheet next to the garlic heads, and continue roasting the two together for 30 to 35 minutes more, until the butternut squash is tender and the garlic heads soft.
- While the butternut squash and garlic roast, I prepare my brown butter and keep that at room temp.
- When the roasting is done, and the garlic has slightly cooled, I squeeze the cloves from the papers and use a fork to mash them into a paste, then set this aside for a moment.
- Next, when ready to assemble my mashed butternut squash, I use a ricer or hand masher to mash the butternut squash for a completely smooth texture,
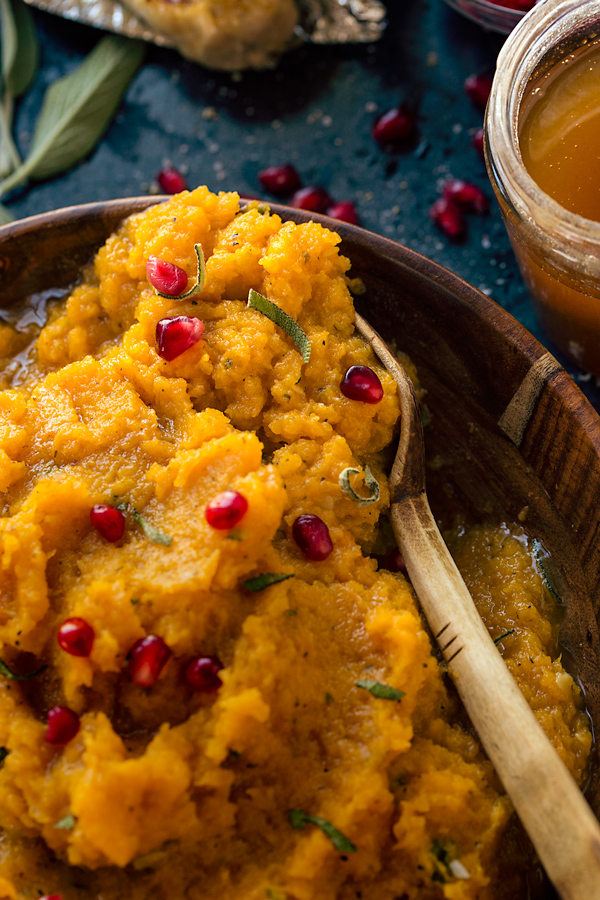
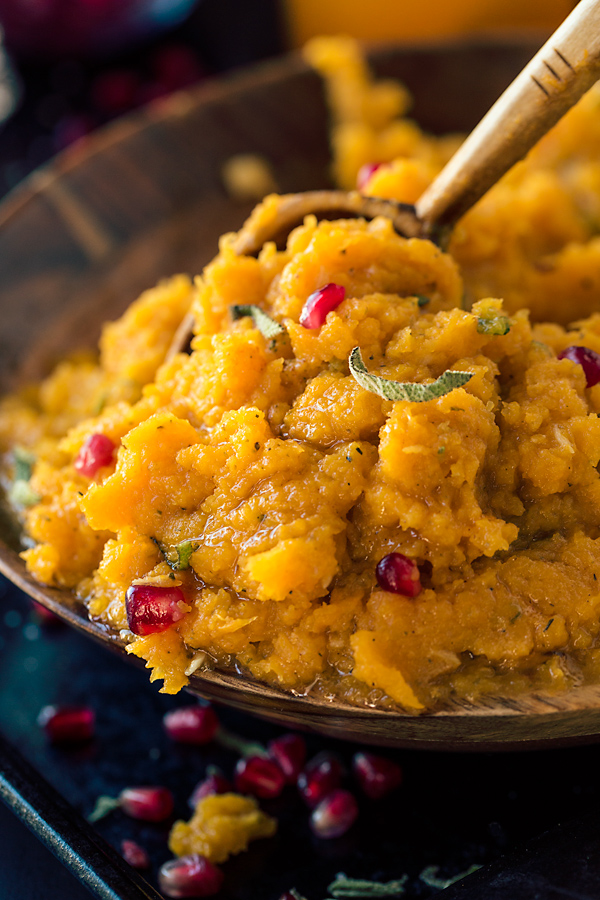
- Then, I fold my roasted garlic in the butternut squash, add in some of my brown butter, sage, season with salt and pepper to taste, and serve hot.
Recipe
Mashed Butternut Squash
by Ingrid Beer

Smooth and velvety, this mashed butternut squash is enriched with brown butter, sage, and roasted garlic for rich, delicious flavor!
Category: Side
Cuisine: American
Yield: Serves 6
Nutrition Info: 267 calories per serving
Prep Time: 10 minutes
Cook time: 45 minutes
Total time: 55 minutes
Mashed Butternut Squash Ingredients:
- 2 heads garlic
- Avocado or olive oil
- Salt
- Black pepper
- 4 pounds peeled and cubed butternut squash (pre-packaged is terrific)
- 2 teaspoons Italian seasoning
- 2 teaspoons chopped, fresh sage leaves
- 1 tablespoon pomegranate seeds, as garnish (optional)
Brown Butter Ingredients:
- 1 cup unsalted, cold butter, cut into cubes
- To get started, gather and prep all of your mashed butternut squash ingredients according to the ingredient list above to have ready and organized for use.
- Preheat the oven to 400°, and line a baking sheet with parchment paper.
- Cut the tops off of the heads of garlic, drizzle with a touch of the oil, and add a sprinkle of salt and pepper. Wrap the heads tightly in foil and place onto the baking sheet and into the oven for 15 minutes.
- Meanwhile, toss the cubed butternut squash with about 2 tablespoons of oil, plus a good pinch of salt and pepper, as well as the Italian seasoning. Once the garlic heads have roasted for 15 minutes, add the seasoned squash to the baking sheet next to the garlic heads, and place back into the oven to continue to roast for 30-35 minutes more, until the squash is tender and the garlic soft and golden. Once the garlic has slightly cooled, squeeze the cloves from their papers and mash with a fork, and set aside.
- While the squash and garlic roast, gather your brown butter ingredients according to the ingredient list above to have ready ready and organized.
- To prepare the brown butter, add the butter to a light-colored sauce pan or skillet, and allow it to melt (this should take about 2 minutes on medium-high heat).
- Once melted, allow the butter to continue to cook, bubbling up and slightly “hissing”, stirring occasionally with heat-proof spatula for even browning. Watch the color of the butter closely, as within about 3-5 minutes it will begin to take on a more golden color and a nutty aroma, which means you are close.
- When you stir and see the solids on the bottom taking on a brownish color, remove your pan from the heat and continue to stir for another moment or so until the solids develop a nice, deep brown color. Then, pour the brown butter, along with all of the delicious browned bits on the bottom, into heat-proof glass jar to cool. (Keep at room temp if using within 24 hours, then place into the fridge, covered tightly, to store any remaining brown butter.)
- Once the butternut squash and garlic are finished roasting, mash the butternut squash very well by hand until completely smooth, or, use a potato ricer (my favorite for a silkier texture), and pass the squash through that and into a bowl.
- To assemble the mashed butternut squash, add 3 tablespoons of the brown butter, and additional salt/pepper, if needed. Fold in the roasted garlic paste, along with half of the chopped sage, and spoon the mixture into s a serving bowl. Drizzle 1 additional tablespoon of the brown butter over top as a garnish, along with the rest of the sage leaves and the pomegranate, if using.
- Serve immediately while hot.
Tips & Tidbits for my Butternut Squash Mash recipe:
- Purchase prepared butternut squash for ease: You can readily find prepared (peeled and cubed) butternut squash at the markets these days—so convenient and quick!
- To make brown butter ahead: I just love to have brown butter on hand for all sorts of uses, as it has a very toffee-like aroma and flavor. The recipe above yields a bit more than you'll need, and I think you'll be glad it does. You can use what's leftover for pasta, or anywhere melted butter is called for such as in cakes, cookies, pancakes, etc. Store the unused portion in the fridge in a glass mason jar with a lid, or a similar container, and easily melt in the microwave for a few seconds to liquify.
- Use a potato ricer, or a masher: I really like to use my potato ricer for this mash recipe, since it yields a smoother texture, but feel free to mash by hand until the squash is as smooth as possible.
Hungry for more butternut squash recipes? Check this Butternut Squash Casserole, this Butternut Squash Lasagna, this Butternut Squash Soup, or this hot Roasted Butternut Squash and Spinach Dip!
Cook's Note: This recipe was originally published in 2017, and has been updated with even more love!
Edie Niemiec
Hi Ingrid,
Can this be made ahead of time and reheated in the microwave? Thanks!
The Cozy Apron
Hi Edie, I don't see why you couldn't make it ahead!
I'm sure you could reheat in the microwave if this is more convenient for you, but I think perhaps stove top, at a low, gently heat, may be a bit better, if you're able.
Hope you enjoy!
Mithu
Brown butter is basically ghee!
Edie
Ingrid. I love your recipes and thank you but I respectfully request an answer on this one. The squash was so dry I could hardly mash it even with the lovely brown butter in it. I weighed the squash and had the correct amount called for in recipe. Are some squashes just drier than others? I tried to loosen it with milk, even some applesauce I had in the fridge but the flavor just wasn't there. I'm sure it's not the recipe but just wondering about the squash and how I can avoid getting a squash that is dry. Luckily, I wasn't having this for company.
The Cozy Apron
Hi Edie, I must admit that you have me scratching my head a little...
I've typically found butternut squash to be a moist squash, with a good amount of water in it. When I roast it, it tends to release a good amount of moisture, so the fact that yours was outright dry, and couldn't even be "brought back to life" with all of your additions is interesting.
Perhaps it was the squash itself, as you wondered. I like to use the pre-packaged and cut butternut squash for this, as I can see the quality of the cubes, to make sure they're nice and fresh, with a bright orange color.
Perhaps you could even try to add a bit more oil to the cut squash before roasting it, to impart more moisture and viscosity. You could also add the roasted cubes to your food processor for convenience as well, so you don't have to mash.
If you do end up giving this recipe another try, I truly hope it turns out much better next time.
Edie
Thanks for your help, Ingrid. I intend to try the recipe again. I was also told that I could loosen it up with a bit of water. I used my hand beater but will use my food pro or Vitamix next time with the addition of water, if I should have this problem again. I use butternut squash in soup and have never had a dry squash before but then I don't roast it for soup.
The Cozy Apron
Perfect, Edie! 😉
Linda Betz
This looks and sounds fabuous, Ingrid! Now I know why I bought a butternur squash yesterday. Lol Will make tomorrow. Thank you for your recipe and gorgeous Michael photos. Your posts are the only ones I read start to finish. I learn so much from you. Hope you two are well and safe. Love to you! ❤
Ingrid Beer
Enjoy, Linda! 🙂