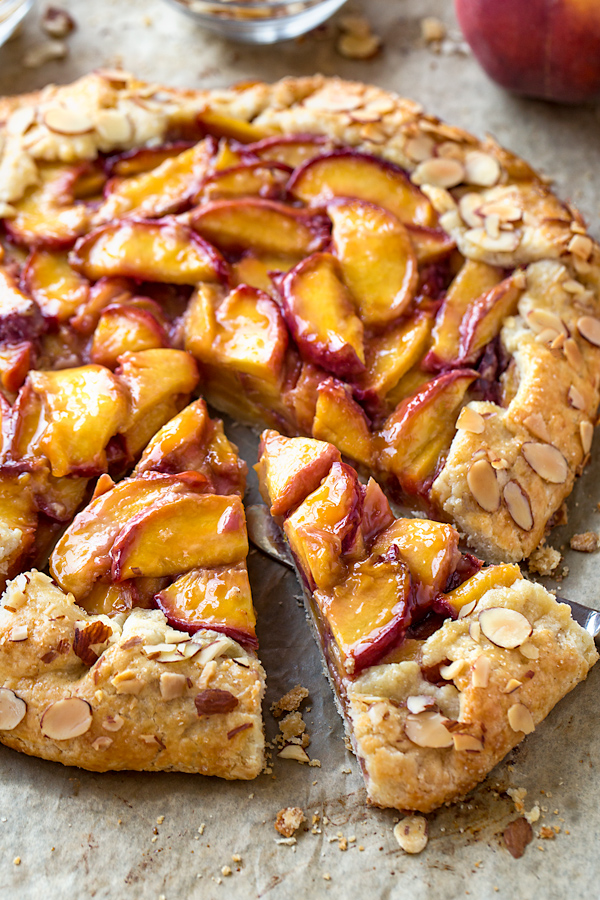
Sweet and juicy, this luscious peach galette makes for a truly mouthwatering summer dessert filled with the irresistible aroma of delicious stone fruit. Brimming with slices of fresh, sweet peaches nestled into an easy buttery crust, this peach galette recipe is simply bursting with fruity flavor in each rustic bite!
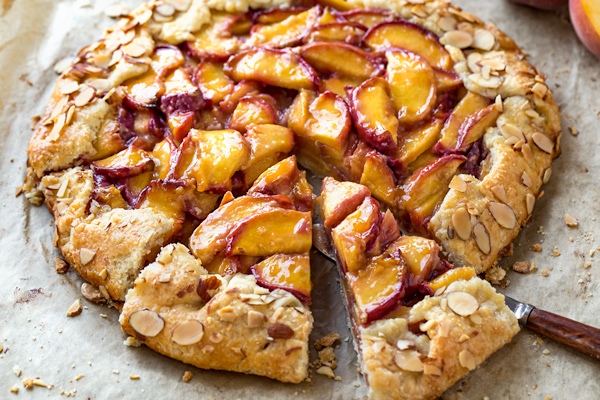
The beautifully rustic, free-form version of peach pie
Even though summers are absolutely sweltering here in Los Angeles, this has never prevented me from periodically turning on my oven and baking up fresh pies, simple crostatas or galettes filled with my favorite juicy fruits of the season.
I simply cannot resist, and it typically depends upon my mood when it comes to which kind of fresh-baked fruit treat I'll prepare...
If I'm in the mood to spend a bit more time rolling out two discs of dough for a double-crust pie, decoratively pinching the seam closed, making the little knife slits in the top crust to create cute little vents (and generally making sure everything is nice and pretty), I'll go the pie route.
But other times I'm all about simple, rustic beauty, and the thought of putting together a more free-form style of dessert just sounds enticing and fun to me, which is when I'll opt to go the galette route.
For me, a galette is basically the free-form version of pie, one where there's only one larger piece of dough to roll out, its center filled with a luscious mound of sweet fruit, with the extra dough simply folded over top keeping the center exposed—so deliciously stunning!
And one of my favorite kinds of galettes is a fresh peach galette, filled with the sweet, ripe, floral peaches of the season, deliciously exuding lots of buttery aroma that suggests a sense of coziness and love as it bakes away in the oven.
Could anything be better?

My Recipe for Peach Galette
One of the best parts about a peach galette recipe is that there are really only a few ingredients for both the crust and for the fresh peach filling.
For the crust, I use flour, unsalted cold butter, some sugar, a tiny splash of vanilla and almond extract, plus a pinch of salt.
I also allow the prepared dough, wrapped in plastic wrap, to rest and chill in the fridge for about 45 minutes to 1 hour (or even up to a couple of days if I'm preparing the dough ahead).
As for the fresh peach filling, I simply slice the peaches with their skin on (you can peel them if you prefer), toss with some brown sugar, a little pinch of cinnamon, and a touch of flour to thicken their juices, and that's it.
Here's a sneak peek at my peach galette recipe: (or just jump to the full recipe...)
- To get started, I prep my galette dough in my food processor, and then wrap the dough in plastic wrap and chill it for at least 45 minutes to an hour.
- Next, I prepare my peach filling in a bowl, and set it aside.
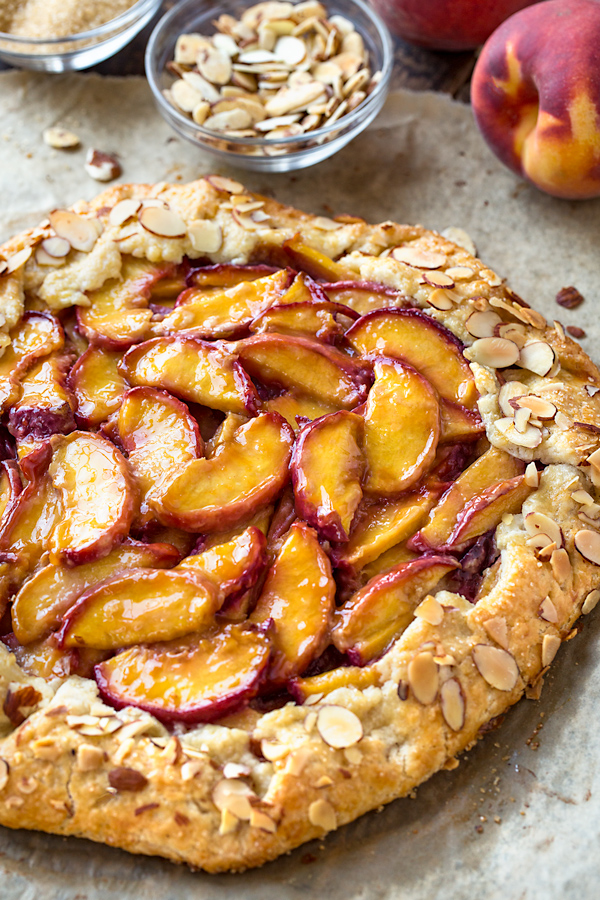
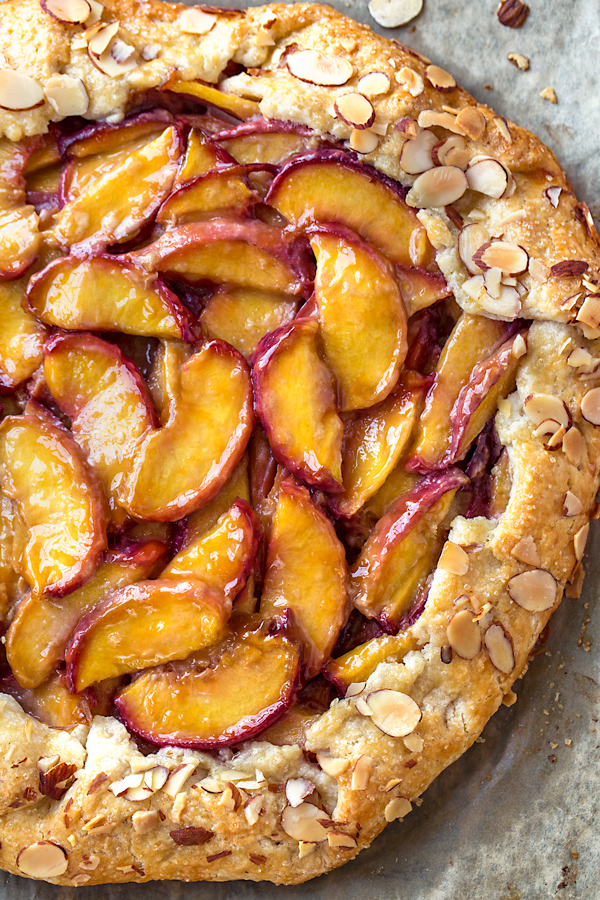
- I then assemble my peach galette, rolling out the dough and adding the peach filling to the center, leaving the peaches exposed, and adding sprinkle of turbinado sugar
- After brushing a tiny bit of egg wash over the edges, I bake the peach galette for about 55 to 60 minutes, until juicy and golden.
- I then allow the galette to cool before slicing and serving.
Recipe
Peach Galette
by Ingrid Beer

This luscious peach galette is brimming with slices of sweet, aromatic fresh peaches nestled into an easy buttery crust!
Category: Dessert
Cuisine: American
Yield: Serves 8
Nutrition Info: 321 calories (per serving)
Prep Time: 1 hour (includes chill time for dough)
Cook time: 55 minutes
Total time: 1 hour 55 minutes
Galette Dough Ingredients:
- 1 ½ cups all-purpose flour
- 3 tablespoons granulated sugar
- ½ teaspoon salt
- ½ cup plus 1 tablespoon cold, unsalted butter, cut into small pieces
- ½ teaspoon pure vanilla extract
- ½ teaspoon almond extract
- ¼ cup plus 1 tablespoon ice-cold water
- 1 egg, whisked, for egg-wash
- 1 tablespoon turbinado sugar, for dusting
- 2 tablespoons sliced almonds, for decoration
Peach Filling Ingredients:
- 6 medium peaches (unpeeled), sliced thinly
- Squeeze of lemon (about 1 to 2 teaspoons of juice)
- ¼ cup brown sugar
- 3 (heaping) tablespoons all-purpose flour
- Pinch cinnamon
- Begin by gathering and prepping your galette dough according to the ingredient list above to have ready and organized for use.
- To prepare your galette dough, add the flour, sugar, and salt to a food processor, and process to combine. Add in the butter and pulse/process until the butter becomes pea-like in size, then add the vanilla and almond extracts to the ice-cold water, and with the processor running, drizzle the water mixture in until the dough becomes moistened and comes together.
- Turn the dough out, gather it up, and shape it into a disc. Wrap tightly in plastic wrap and allow to rest in the fridge for at least 45 minutes to 1 hour before rolling out and baking, or even longer, if doing ahead a couple of days. (Dough can also be frozen and then defrosted in fridge for a couple days if you'd like to prepare even farther in advance.)
- After you're dough has chilled, preheat your oven to 350°, and line a baking sheet (roughly 18 by 13 inch) with parchment paper.
- Nest, gather and prep your filling ingredients according to the ingredient list above to have ready and organized for use.
- To make the peach filling, add your sliced peaches to a large bowl, along with the small squeeze of lemon, the brown sugar, flour and pinch of cinnamon, and toss to coat. Set aside for a moment.
- Roll out you galette dough to a round shape about 12 to 13 inches, and carefully transfer it to the prepared baking sheet. Mound the peach filling in the center, leaving about a 1 inch border of dough around the edges.
- Fold the dough edges towards the center over the peaches in a rustic fashion so that you create little pleat-like folds. Then, brush some of the whisked egg over the dough, sprinkle over the turbinado sugar and the sliced almonds, and bake for 55 to 60 minutes (turning half-way through the baking), until golden-brown and the fruit is soft and juicy.
- Allow the peach galette to completely cool on the baking sheet for several hours, until the filling has set and you can easily slice it.
- Serve the peach galette on its own to enjoy the flavor of the delicious fruit of the season, or add vanilla ice cream or homemade whipped cream, if desired.
Tips & Tidbits for my Peach Galette Recipe:
- Cold, unsalted butter: Be sure to use very cold butter when preparing your dough, as this will keep things nice and flaky and tender. Also, be sure that your butter is unsalted, as you don't want the dough to be too salty.
- Peeled or unpeeled peaches: Because I like the bit of extra color that the skin of the peaches provides, I leave the skin on. This saves time as well! But it you prefer to remove the skin, feel free to peel the peaches with a vegetable peeler.
- Leave a bit of a border with the dough: Once you roll out your galette round, and begin mounding your peaches in the center, make sure to leave about a 1 inch border of dough so you can partially fold it over the fruit.
- Turbinado sugar for texture and sparkle: While you can certainly sprinkle regular granulated sugar for the finishing touch over the dough before baking, turbinado is a bit more “crystal-like” and textured, and creates a bit of crunch and sparkle.

Craving more delectable summery desserts? Check out my Nectarine Crumb Tart recipe, my Berry Crisp recipe, my recipe for Cherry Cobbler with Cream Biscuit Topping, Strawberry Oatmeal Bars, Lemon Cheesecake Bars, or my recipe for Blueberry Bars!
Cook's Note: This recipe was originally published in 2018, and has been updated with even more love!


Colleen
Looks luscious! May I ask whether it was difficult to transfer to a serving dish after it was baked? Any trick to doing it without it cracking?
The Cozy Apron
Hi Colleen! You ask great question!
This luscious peach galette is one of those desserts that truly is best served right off the juicy, beautifully rustic parchment paper and baking sheet that it was baked on—there's just something about this particular kind of dessert that makes it look (and somehow taste) that much better when served that way. 🙂
Plus, keep in mind that it is a bit larger than a traditional pie or cake—it's about 12-13" round, so it doesn't actually comfortably fit a cake stand or traditional plate.
When I'm baking this just for us to enjoy, I typically leave it on the baking sheet and cut slices from it; however, I have transferred it, with the parchment, onto a large wooden board as well.
Once it cools, it is quite sturdy, and you can either grab the corner of the parchment paper and carefully slide everything off the baking sheet; then, if you want to serve it on something specific, you can slide the galette off the parchment (maybe use a spatula first to make sure the bottom isn't sort of "sticking" to the paper).
Hope that helps! And may you enjoy it in all of its rustic loveliness should you choose to prepare it!
Patricia Bontrager
Made this over the weekend and it was a huge hit! This was my first time ever making a galette, so I was a little nervous. But it came out great! Thanks for sharing the recipe!
The Cozy Apron
Oh, that's terrific, Patricia! This is one of my favorites, the perfect fruity, summertime dessert. 😉
Thanks so much for taking the time to share your experience with me, and may you find many more luscious desserts on the site to try your hand at. Happy baking to you!