Roasted chicken breasts seasoned with garlic and herbs make for a rustically comforting meal. Exceptionally juicy and succulent with a crisp skin, these oven roasted chicken breasts are easy to prepare and especially delicious served along with your favorite savory side!
Roasted Chicken Breasts, a Perfectly Rustic Meal
There's an elegant sophistication to a simple and rustic meal...
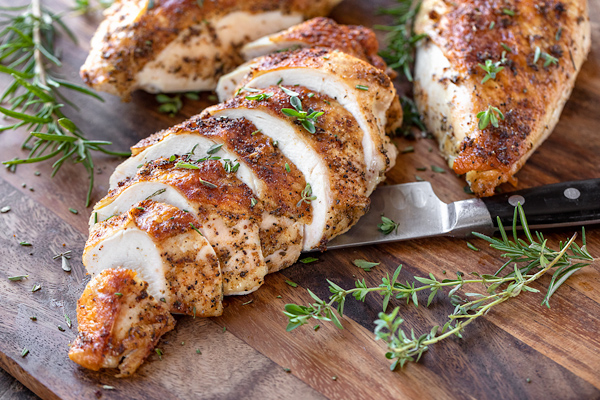
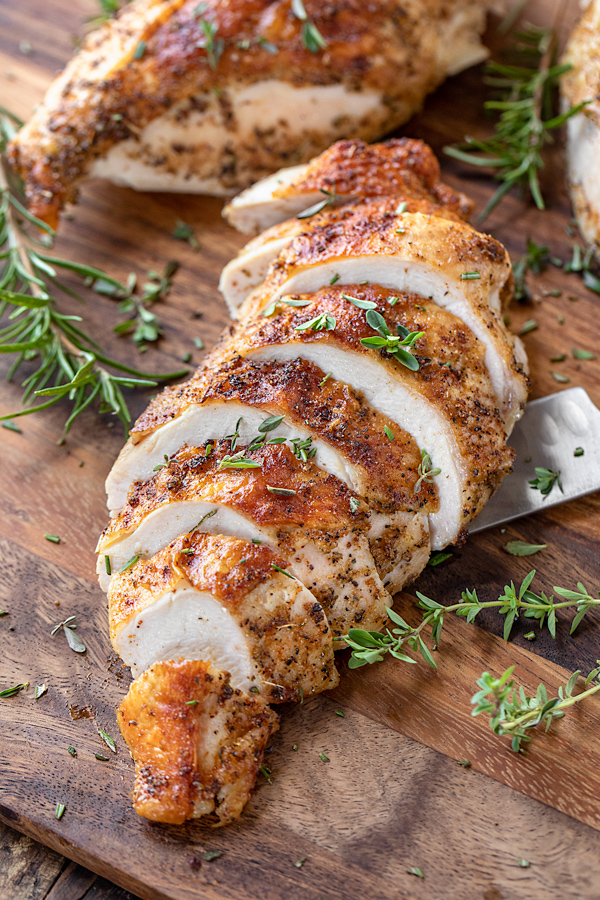
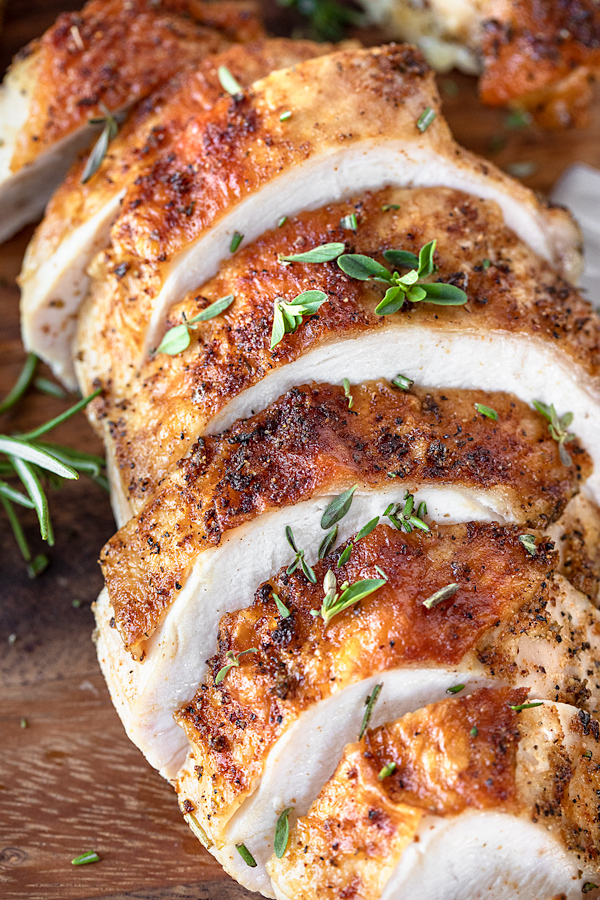
For me, little is more inviting than a perfectly roasted chicken breast, skin deliciously crisp and well seasoned with flecks of herbs, sea salt, black pepper, and a little hint of garlic. It's nothing fancy, yet totally and utterly exquisite. What could be better on a cold evening when the body needs warming and the spirit needs lifting?
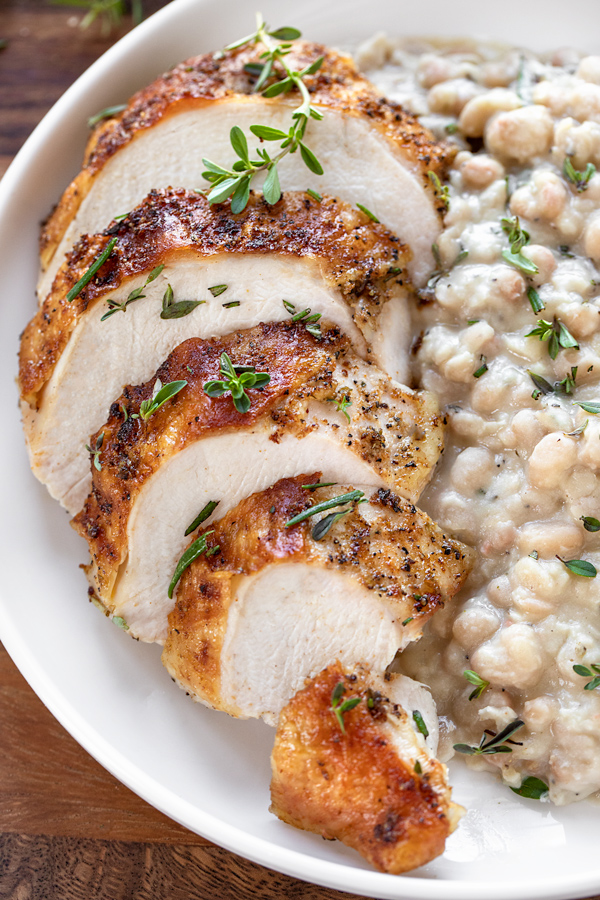
Finding some comfort and coziness in freshly-prepared oven roasted chicken breasts is one of my favorite little food pleasures, and when succulent slices are paired with my favorite accompaniment of creamy white beans, this becomes the epitome of a perfectly rustic meal, one that is wonderfully unpretentious and very approachable.
How to Roast Chicken Breasts That Are Juicy and Flavorful
Roasting chicken breasts in the oven is just the way I love to prepare them when I'd prefer to be a bit more “hands off” with my meal prep.
The secret to moist, succulent and flavorful chicken breasts is in the seasoning, and then the hot oven takes over and works its magic—so simple!
When preparing roasted chicken breasts, I always purchase bone-in and skin-on breasts, as this is where much of the innate flavor comes from. The rest is up to the seasoning I choose to use, and in this case, I opt for good olive oil, sea salt, black pepper, dried (and fresh) herbs, and a hint of garlic under the skin.
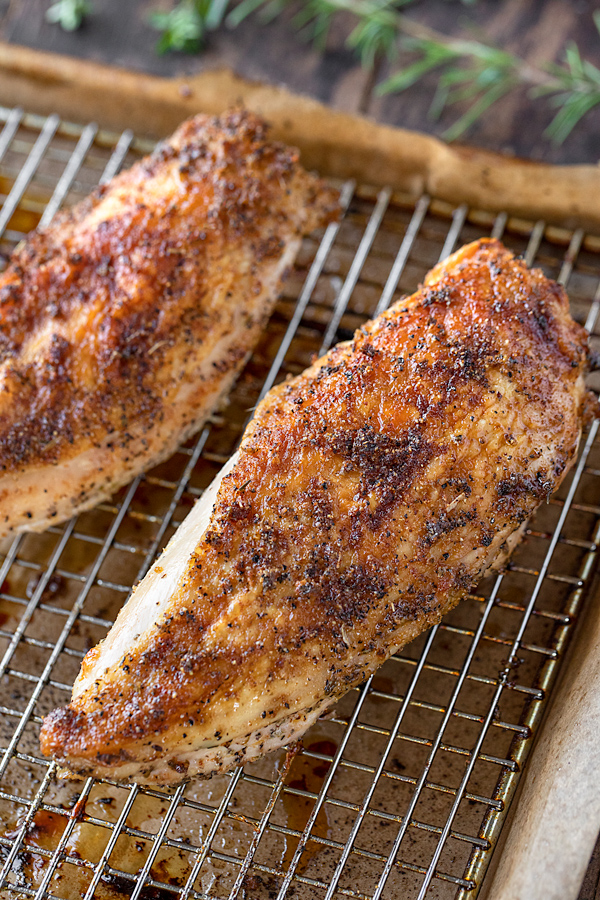
Then, I allow the chicken breasts to roast for 45-50 minutes until crispy, golden and wonderfully juicy.
Here's a peek at my oven roasted chicken breast recipe: (or just jump to the full recipe further down...)
- I begin by preheating my oven to a nice, hot temperature (400°); then, I line a small baking sheet with foil, and place a wire rack over top.
- To season my chicken breasts, I gently pull the skin away from the meat using my finger, taking care not to tear it or pull it off; I add some garlic mixed with good olive oil under the skin, then sprinkle the remainder of my seasoning ingredients over top of the breasts.
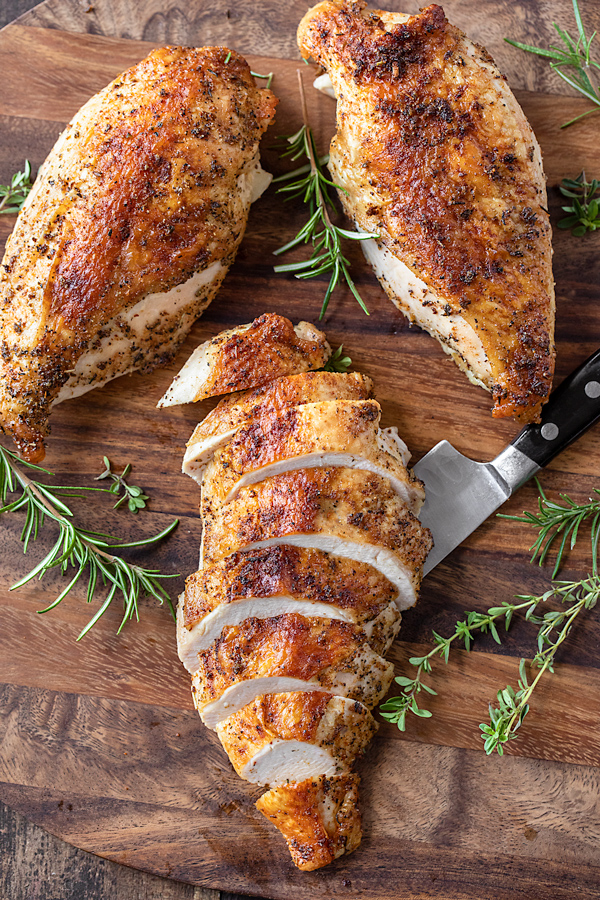
- I place the chicken breasts onto a wire rack and roast the chicken breasts for about 45-50 minutes (depending on their size), or until cooked through (165° internal temperature); then, I allow the chicken breasts to rest for about 10-15 minutes before I slice them.
- To serve, I pair the roasted chicken breasts with a cozy side dish (I happen to adore creamy white beans), or even very simply with some crusty bread on the side.
Recipe
Roasted Chicken Breasts
by Ingrid Beer

Category: Entree
Cuisine: American
Yield: Serves 8
Nutrition Info: 208 calories (per ½ breast)
Prep Time: 15 minutes
Cook time: 50 minutes
Total time: 1 hour, 5 minutes
Ingredients:
- 4 skin-on and bone-in chicken breasts (“split” chicken breasts)
- 2 cloves garlic
- Olive oil
- Sea salt
- Black pepper
- 2 teaspoon Italian seasoning
- 1 teaspoon granulated onion
- 1 teaspoon granulated garlic
- ½ teaspoon paprika
- 1 teaspoon chopped fresh rosemary leaves
- 1 teaspoon fresh thyme leaves
- Preheat the oven to 400°, and line a baking sheet with foil or parchment paper and top with a wire rack.
- Place the chicken breasts in front of you on a work surface; using your fingers, gently pull the skin from the breast meat, taking care not to poke a hole in the skin (even partially pulled away will be enough).
- In a small ramekin, mix together the garlic cloves with 1 tablespoon of olive oil, and rub this mixture equally between the skin and breast meat of each piece of chicken, then smooth the skin over the chicken breasts to cover them well.
- Liberally sprinkle over each chicken breast some sea salt and some black pepper, then sprinkle over equal amounts of the Italian seasoning, the granulated onion and garlic, and the paprika.
- Place the chicken breasts onto the wire rack, and roast for about 45-50 minutes, or until a digital thermometer registers 165°.
- Allow the chicken breasts to rest for about 10-15 minutes before slicing, then place onto a serving platter and sprinkle over the fresh rosemary and thyme, and serve.
Tips & Tidbits for my Roasted Chicken Breasts:
- Bone-in and skin-on “split” chicken breasts: Using good quality, organic split chicken breasts with the bone in and skin on is the way to go when roasting chicken breasts. The bone adds flavor from the inside as the chicken roasts, and the skin adds a layer of savory flavor and moisture from the bit of fat in it. (Skinless and boneless chicken breasts will not work with this recipe.)
- Season liberally: Don't be afraid to use a couple of good pinches of salt when seasoning these roasted chicken breasts, as it needs to penetrate into the meat. Be liberal with the olive oil as well, and with the herbs and black pepper too.
- Crank up the oven to 400°: Because we're looking for a nice crisp skin here, the oven needs to be set to 400° so that the chicken doesn't cook for too long, steaming rather than roasting to golden perfecting.
- Use a digital thermometer for an accurate internal temp: Using a digital thermometer inserted into the thickest part of the breast is the best way to know when your roasted chicken breasts are cooked. You're looking for a reading of 165°, then you know you're golden.
- Rest the chicken before slicing: To avoid all of those savory juices from flowing out of your roasted chicken breasts, allow the breasts to rest for about 10-15 minutes before slicing the meat from the bone. I sometimes even remove the bone after the chicken has rested, by carefully pulling the bone away from the meat, but this can be a bit challenging. Simply use a sharp fillet knife to slice the chicken once rested, if you prefer.
Hungry for more chicken recipes? Check out this Chicken Cacciatore, this Fried Chicken, these Stuffed Chicken Breasts Southwest Style, or this Pineapple Chicken!


Melissa
Delicious! I used a cornish hen instead of the four breasts (I halved all the ingredients except the garlic), and it was fantastic! We ate it with sides of roasted potatoes, brussels sprouts/shallots, and some lovely sliced apples. I recently got A LOT of turkeys on sale (love those after-holiday food sales!), so I might try this recipe on one. Thanks again for the love! Love, Melissa
The Cozy Apron
Hey Melissa, that's great!
I think this recipe will work great with the turkey as well, or maybe check out some of my turkey breast recipes for that too—happy cooking!
Melissa
Ohhhh, we love the Roasted Turkey Breast with the orange glaze, as well as the Roasted Garlic Turkey Breast! Both are delicious, but the one with the glaze is our favorite. Basically, we can never go wrong with a recipe from you! Love, Melissa
Sarah
Looks beautiful…but it also looks like the breast has been boned.
The Cozy Apron
Hi Sarah, thanks so much!
And yes, you're absolutely right, the bones have been removed in the photos, prior to slicing. I mention this tip under the "Tips & Tidbits" section (below the recipe instructions), under the heading "Rest the Chicken before slicing". I find the breasts easier to slice with the bones removed after roasting. 😉