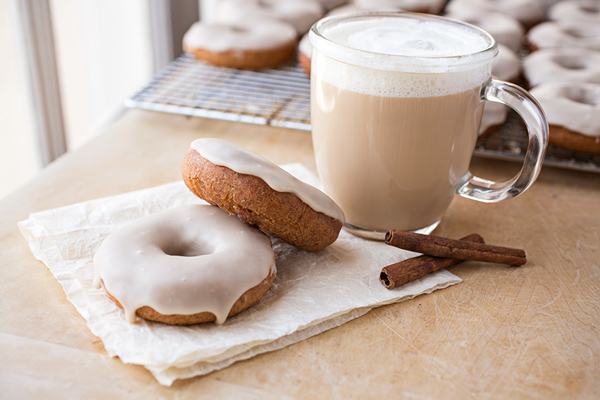
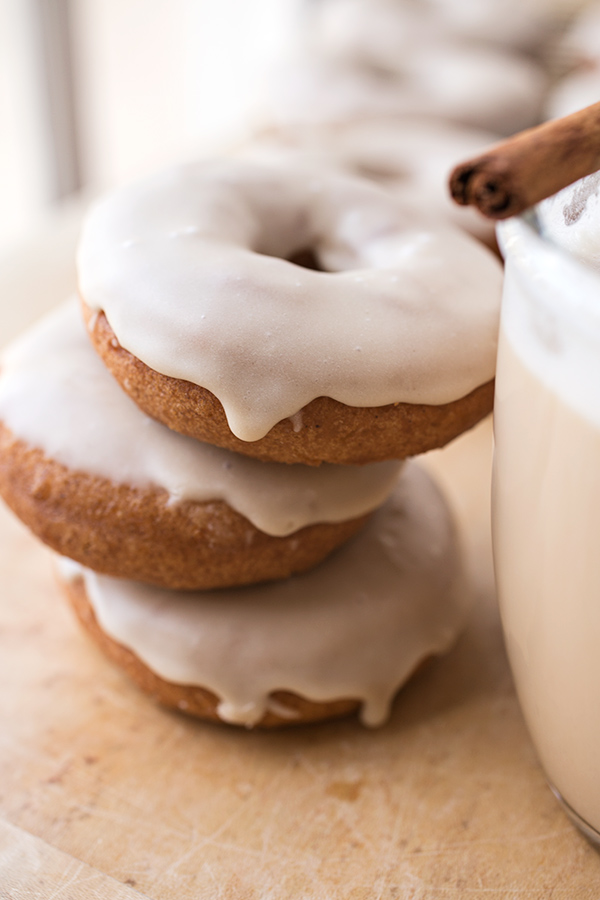
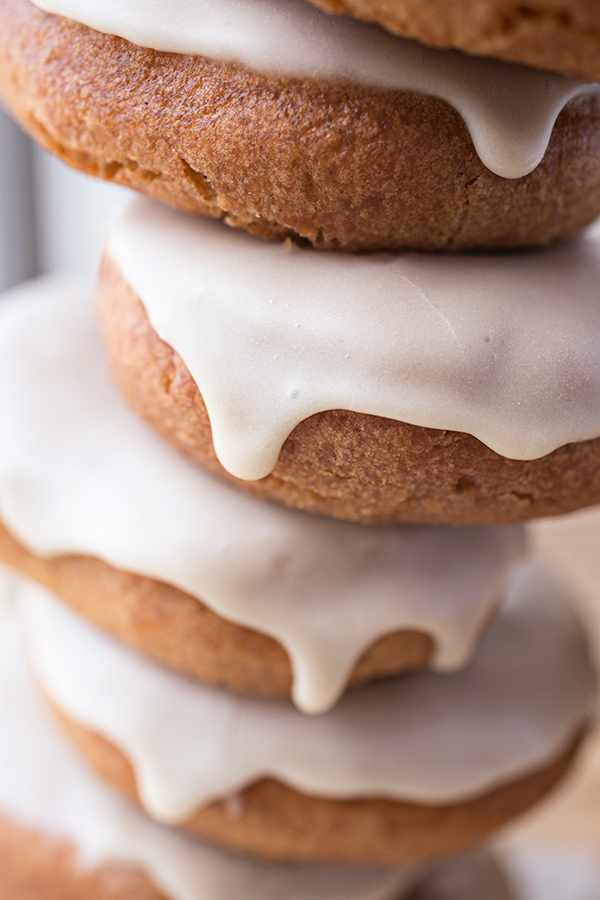
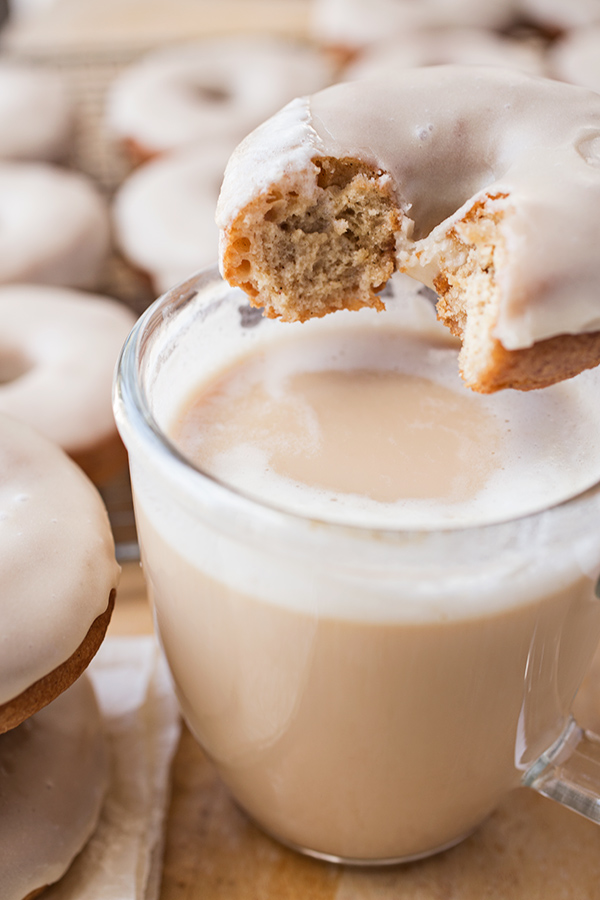
My vanilla chai latte donuts are delectably moist and light, and brimming with sweet, warming spices. They're prepared with an easy cake donut dough infused with black tea and chai spices, then briefly fried until golden and dipped in a creamy vanilla glaze. This tasty donut recipe is perfect to enjoy on the side of your favorite chai latte!
Homemade donuts with the flavors of vanilla chai latte
To say that I like to enjoy a good donut from time to time is a bit of an understatement.
Both my hubby and I love donuts! And while we try to go easy on 'em and save them as an occasional sweet treat, I must admit that the temptation is always there to stop and get a few to have with afternoon coffee or tea.
Heck, it certainly doesn't help that we have several really cool, gourmet-style donuts shops here in LA to stoke our donut-loving fire.
Our famous last words are "I think I'll just get two...". We each end up with three or four, because we become absolute gluttons when it comes to donuts.
Seeing as I love to experiment with homemade donuts in my own kitchen from time to time (my yummy apple cider donuts, banana donuts, my maple donuts...), I wanted to create a fun donut flavor filled with the warm, spicy notes inspired by a vanilla chai latte.
These cute little cake-style donuts are fun to make, infused with black tea and spices such as cinnamon, allspice, cardamom, ginger, nutmeg and cloves. They're finished with a creamy vanilla glaze to tie all those sweet, spicy, chai latte flavors together.
Talk about the perfect treat to enjoy with a hot, creamy, vanilla chai latte!

My recipe for vanilla chai latte donuts
This scrumptious donut recipe is a classic "cake" donut-style of dough, made without yeast and the need for proofing.
I simply use flour, baking powder, some milk, eggs, spices, and a bit of melted butter in this dough. And the way I like to infuse the flavor of the tea here is to warm the milk and steep a few black tea bags (which smells amazing!), then allow the milk to cool to room temp before adding to the recipe.
Cake donut dough can be quite sticky to handle, and I found the trick to more easily work with it is to allow the donut dough to chill…
Giving the donut dough about 1 hour to chill in the fridge after mixing it together helps the dough firm up a bit. Then it can be more easily rolled out to about ½ inch thickness and cut out using both a 3 inch cutter for the donuts and 1 inch cutter for the holes.
I also found that taking my time and being gentle when working with the dough helps, because it benefits from a light touch to make for light, moist donuts.
Once the donuts are cut out, I lightly fry them in a neutral oil (typically vegetable oil) for a brief 1 to 1 ½ minutes per side, or just until the donuts are golden.
Making sure that the oil is around that 360° to 365° temp by using a thermometer also helps, as this way the oil is not too hot, which can burn the donuts, or too cool, making them greasy and heavy.
Here's a sneak peek at my vanilla chai latte donuts recipe: (or just jump to the full recipe...)
- To get started, I prep my donut dough, cover it, and allow it to chill in the fridge for an hour.
- Once the donut dough has chilled, I slowly bring my oil up to temp (365°). While the oil heats, I gently roll out my donut dough and cut out the donuts and holes. (Holes can be gathered up and re-rolled to make more donuts, or can be fried as donut holes.)
- I then fry the vanilla chai latte donuts in batches until golden, and allow them to drain on a paper towel-lined wire rack for a few moments before transferring them to another wire rack to completely cool.
- While the donuts cool, I whisk together my creamy vanilla glaze, then dip each donut into the glaze, and allow the glaze to set up before enjoying.
Recipe
Vanilla Chai Latte Donuts
by Ingrid Beer

These moist vanilla chai latte donuts are infused with black tea and lots of warming, chai-inspired spices for sweet flavor in each bite!
Category: Dessert
Cuisine: American
Yield: 22 donuts
Nutrition Info: 330 calories (per donut)
Prep Time: 1 hour 30 minutes (includes dough chill time)
Cook time: 12 minutes
Total time: 1 hour 42 minutes
Vanilla Chai Latte Ingredients:
- ¾ cup plus 2 tablespoons whole milk
- 4 black tea bags
- 3 cups all-purpose flour (plus a little extra for sprinkling/rolling out dough)
- 1 tablespoon plus ½ teaspoon baking powder
- Pinch salt
- ½ teaspoon ground cinnamon
- ½ teaspoon ground allspice
- ¼ (slightly heaping) teaspoon ground cardamom
- ¼ teaspoon ground cloves
- ¼ teaspoon ground nutmeg
- ¼ teaspoon ground ginger
- 1 cup granulated sugar
- 2 large eggs, room temp
- 1 ½ tablespoons pure vanilla extract
- ¼ cup unsalted, melted butter, slightly cooled
- Vegetable oil for frying, roughly 6 to 8 cups
Creamy Vanilla Glaze Ingredients:
- 3 cups powdered sugar, sifted of lumps
- 1 tablespoon pure vanilla extract
- 4 ½ tablespoons whole milk
- Begin by gathering and prepping all of your donuts ingredients according to the ingredients list above to have ready and organized for use.
- Add the milk into a small saucepan, and heat just until gently bubbling on the sides, and turn off the heat. Add in the 4 black tea bags, and steep for about 10 to 15 minutes, then remove the tea bags, squeezing them out to get as much flavor as possible, and allow the infused milk to cool to room temp.
- To a medium-large bowl, add the flour and the rest of the ingredients up to and including the ground ginger, and whisk to blend. Set these dry ingredients aside for a moment.
- Next, to another large bowl, add the sugar and the eggs, and using a hand mixer, mix on medium-high until very thick and pale, about 2 to 3 minutes. Add in the vanilla extract and the melted butter, and mix again until incorporated.
- Then, add about ⅓ of the dry ingredients into the sugar/egg mixture, and using a wooden spoon now, hand-mix until incorporated. Next, pour in half of the black tea-infused milk, and mix that in until incorporated. Repeat the process with another ⅓ of the dry ingredients, then mix, then the rest of the milk, then mix. Finish with the rest of the dry ingredients, and gently mix just until everything is incorporated (take care not to over-mix), and the dough is soft and fairly sticky, which you want.
- Place a piece of plastic wrap directly onto the dough in your bowl, and place into the fridge for about 1 hour to chill.
- After an hour, prepare your work space to roll and cut out your dough by sprinkling a little flour over your work surface.
- Add your oil to a large Dutch oven or heavy bottom pot (it should come about 2 inches up the sides), and begin to very slowly heat your oil to 360 - 365° (use a thermometer for accuracy).
- While the oil heats, carefully turn out the dough onto your lightly floured work surface (sprinkle a little extra on top of the dough, if necessary) and using a lightly floured rolling pin, gently roll the dough to about ½ inch thickness.
- Using a 3 inch cutter for the doughnuts and a 1 inch small cutter for the doughnut holes, cut the doughnuts out and set them aside on a large baking sheet with parchment paper to hold.
- Gather any scraps of dough you have left, gently roll them, and cut those out, too, until all dough is cut out. (You can fry the doughnut holes if you'd like, but I just gather mine up and make another doughnut or two.)
- Once the oil is hot, work in batches by adding in about 3 to 4 doughnuts, and allow them to fry on that first side for about 1 to 1 ½ minutes, or until lightly golden-brown and puffed, then flip (using tongs) and allow to fry on the other side until golden. Remove and allow the donuts to drain on paper towel-lined cooling racks. Repeat until all doughnuts are fried.
- If you're frying the doughnut holes, fry for about 30 seconds, moving them around to fry all sides, or until golden. Allow those to drain, as well.
- Allow the doughnuts/holes to cool completely before glazing.
- While the donuts cool, gather and prep your creamy vanilla glaze ingredients according to the ingredient list above to have ready and organized for use.
- To make the glaze, add all ingredients to a large bowl, whisk to blend until smooth.
- To glaze the vanilla chai latte donuts, dip each doughnut liberally into the creamy vanilla glaze, lift, and allow any excess to drip off. Set aside on the wire cooling rack to allow the glaze to set up before enjoying.
Tips & Tidbits for my vanilla chai latte donuts recipe:
- Use a good quality black tea to infuse lots of flavor: To create that chai latte flavor in these donuts, I infuse the milk called for in the recipe with black tea bags. Use your favorite high quality, aromatic black tea (bags are easiest, though you can use loose tea and strain it out of the milk) for intensity.
- Lots of fresh, chai-style spices: Classic chai spices include cinnamon, ginger, allspice, cloves, nutmeg and cardamom, so I use a balanced amount of each in the donut dough. It's a very warming mixture and provides lots of delicious flavor in these homemade donuts. Take care to ensure you use fresh spices, replacing any older spices that may be past their "best by" date.
- Take time to chill the donut dough to help with the stickiness: Because these cake donuts are made with a moist donut dough, they can be quite sticky to roll and cut out if not chilled for about an hour after preparation. The chill time helps the dough firm up a bit and absorb the moisture, making it easier to roll and cut out.
- Fry just long enough to get a golden color: Taking care to make sure your oil stays around 360° will help ensure your oil doesn't get too hot and burn the donuts, or isn't so cool that the donuts absorb too much oil and become greasy and heavy. These donuts are fairly small to medium-small and take roughly 1 to 1½ minutes to fry on the first side, then flip and briefly fry (roughly 1 minute) on the second side.
- Allow the donuts to do an initial drain on paper towels: Whenever I make homemade donuts, I like to line a wire rack with a couple layers of paper towels to place the freshly-fried donuts on to help absorb any excess oil. I then transfer them to an unlined wire rack to completely cool.
- How to store these vanilla chai latte donuts: I like to use a cake dome (with a platter and a glass or plastic dome cover) to keep these donuts fresh for a day or two. Since donuts don't stay super moist and fresh beyond the second day typically, try to enjoy these when freshly prepared for best results. This recipe makes a big batch of donuts, so you can freeze half of these donuts once cooled, if desired (either with the glaze or without) to enjoy again at a later time.

Hungry for more sweet and cozy treats like this? Check out my recipe for Banana Donuts, Apple Cider Donuts, Maple Donuts, or these cute, little Apple Fritters!
Cook's Note: This recipe was originally published in 2014, and has been updated with even more love!
Janis
I am eating these right now and they're amazing! I have made them several times before, usually in the fall or whenever I want a homemade sweet treat. 🙂 I haven't quite mastered the donut part, I just make a bunch of donut holes. This time I made them with Walmart's Great Value gluten free flour and they turned out great even with the slightly different flour texture. thank you for sharing your heart in your amazing recipes. 🙂
The Cozy Apron
Oh, Janice, that makes me so happy!
I'm thrilled to read you've been enjoying these, even if, for now, they're just the donut holes, haha! 🙂
Actually, if you're a fan of these, then I've got a real treat coming for you this upcoming weekend...I'll be posting a brand new donut recipe, and let me tell you, the flavor and texture is super delicious, and perfect for fall! So please do stop by and check out the new donut recipe which I'll be sharing in the next couple of days, as perhaps, you'll enjoy that one as well.
Thanks so much for your kind comments—happy cooking, Janis!
Janis
Just coming to say hi, and to say that I made these for a Christmas party this weekend. Everyone was so impressed with the flavor. I'm going to make them again for Christmas, even though I shouldn't haha. Thank you for the delicious donut recipe. 🙂
The Cozy Apron
Oh, I love it! So glad they turned out for you!
Happy to read you'll be making these again. You made me chuckle when you said you shouldn't, lol...I can relate! But if we can't indulge with abandonment a bit during the holidays, then when the heck can we?! 🙂
May you enjoy the holiday season, and eat lots of doughnuts, haha! Sending my warmest wishes your way.
Maria
Could these doughnuts be baked instead of fried?
The Cozy Apron
Hi Maria, the ingredients and quantities in this recipe are specific to fried donuts, so, no, I would not bake these.
However, my banana donuts are baked, if you'd like to check those out. And, please stay tuned...I actually have a really delicious baked donut recipe coming in the next couple weeks! 😉