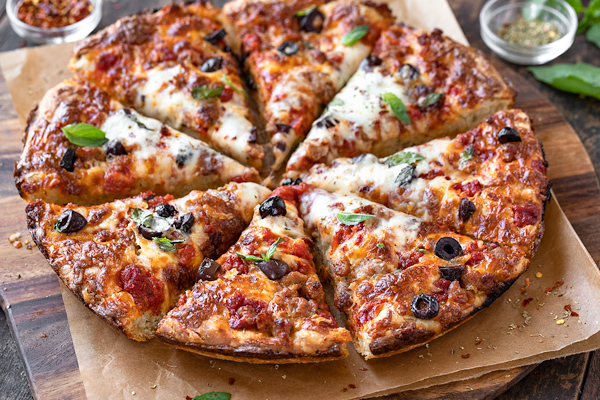
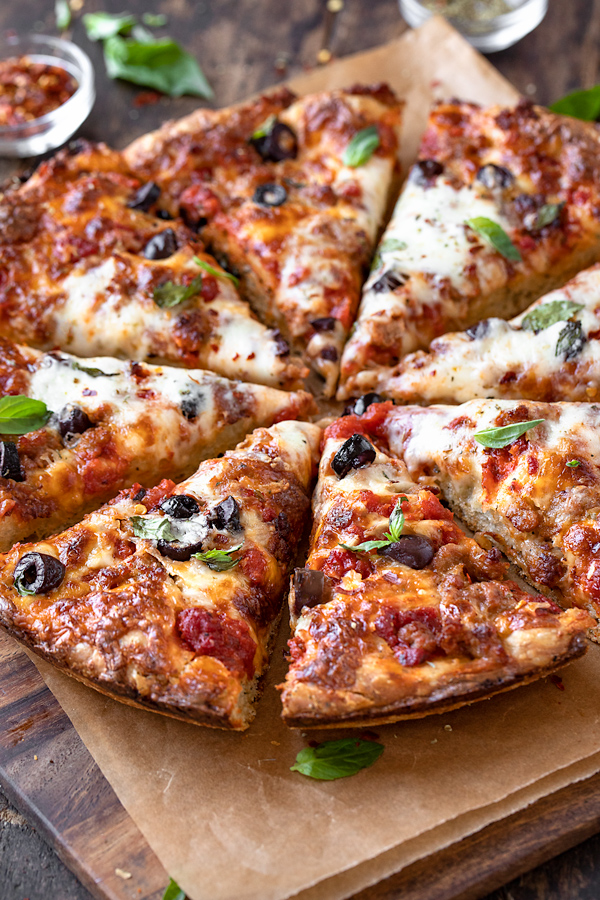
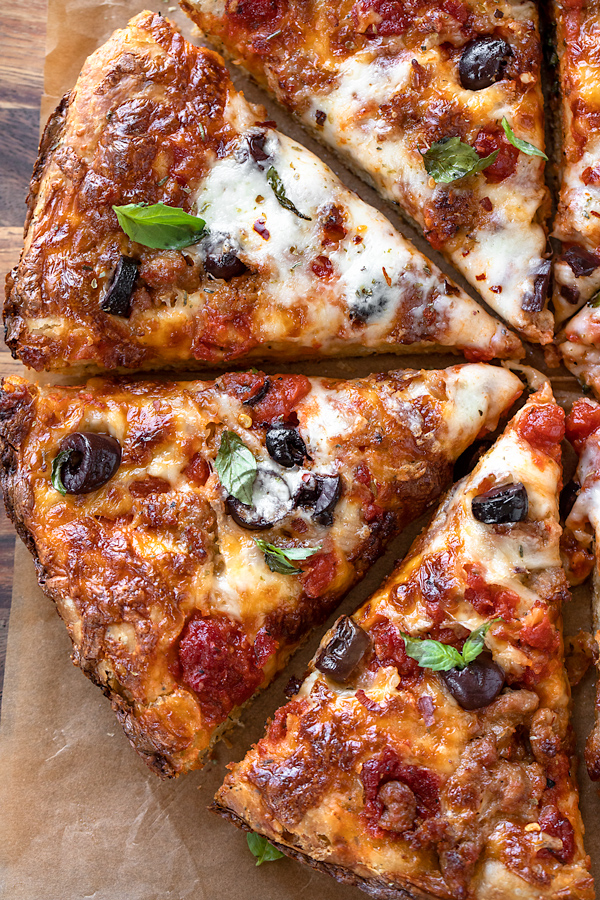
My cast iron pizza makes “pizza night” not only delectably scrumptious, but a whole lot of fun! Prepared with a simple, no-knead pizza dough that rests in your fridge until you're ready to make and bake your pizza, this cast iron skillet pizza is topped with spicy sausage, fresh basil and olives for super gourmet flavor!
Finally... A Pizza That Really Is Better Than Take Out or Delivery!
To tell you that my hubby and I have been on the hunt for our “ideal” pizza for years now is not an overstatement.
Sure, we've enjoyed some fairly tasty take out or delivery pizza from time to time, but have never truly been “wowed” because the pizza is either too thin or too thick and bread-y, or the sauce is too sweet or not flavorful enough, or yadda, yadda, yadda... the list goes on.
And any time in the past when we've attempted to prepare our own homemade pizza, we've struggled with that as well...
The crust wouldn't bake up quite right on the baking sheet, or was too dense or doughy, or simply just didn't turn out how we hoped that it would, with lots of pomp and circumstance surrounding the entire preparation of it.
"All work and no play (or pizza) makes Jack a dull boy!"
The whole “quest for the perfect pizza” has been a “thing” for us for quite a while now, and my hubs and I had pretty much resigned ourselves to the fact that we were destined for a life of so-so pizza. Until now, that is...
Because I can be a bit stubborn when it comes to recipes besting me, and like to use past flops as my motivation to get something right if at all possible, I thought I'd go back to making homemade pizza once more, and try my hand at a cast iron pizza recipe.
Go figure, but I hadn't yet given this type of pizza a spin yet, and it seemed like an interesting option.
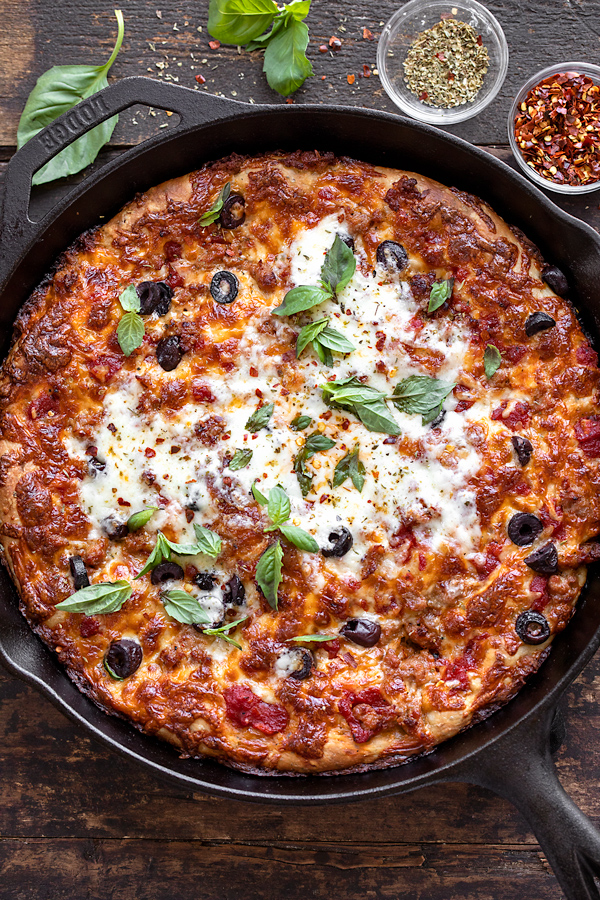
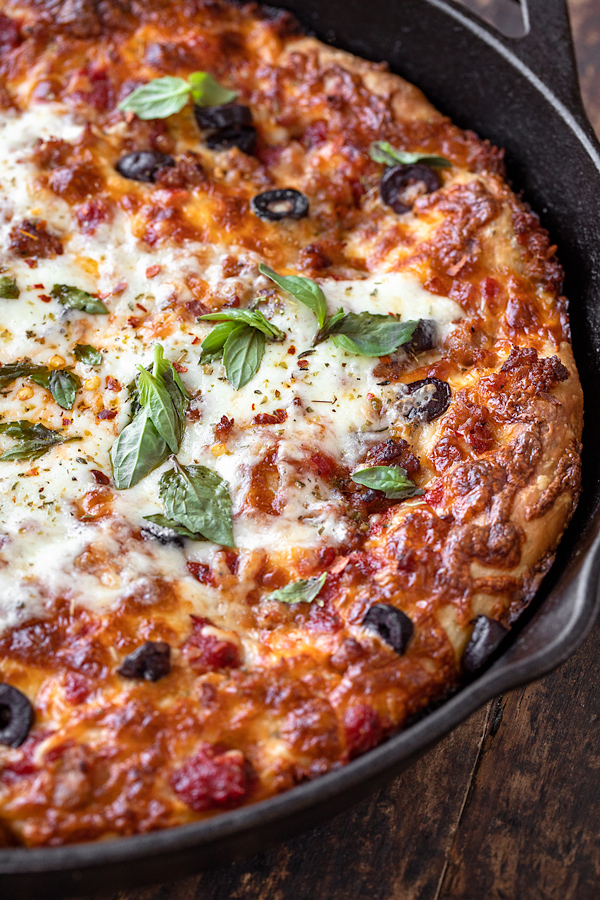
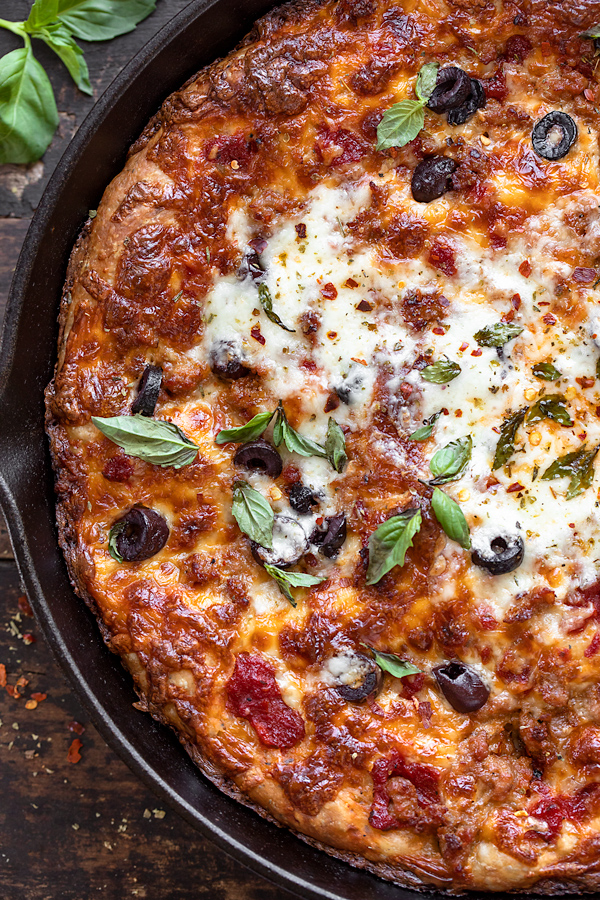
I ended up playing around with the recipe for this cast iron skillet pizza, and was so excited and amazed at how easy it was to prepare and how absolutely delicious it turned out! This pizza has just the right amount of tasty, golden-brown cheesy crust that's light yet tender, and can hold up like a champ under flavorful ingredients.
It's also our ideal thickness when it comes to the dough aspect of a pizza, as it's not too thin and flimsy (sorry NY-style pizza) nor too thick and heavy, but “just right”, to quote Goldilocks.
So finally, we've found our ideal pizza, and because we enjoyed it so much, and now consider cast iron pizza our “go to” pizza, I thought it'd be a fun treat to share with you for your own pizza nights! 🙂
A No-Knead Cast Iron Pizza Recipe
Starting with a good, simple-yet-flavorful no-knead pizza dough is the way to go when making cast iron pizza.
The folks at King Arthur Baking Company came up with a fantastic recipe in their Crispy Cheesy Pan Pizza, and I was truly inspired.
But because I can't leave well enough alone, I made my own tweaks to it using dried herbs, a bit more salt, a pinch of sugar, and a healthy drizzle of olive oil to create a super savory and flavorful crust that's tender yet still has some “bite” to it.
I'm in love with this pizza dough recipe because just a few ingredients are combined in a large bowl until they come together into a ball. Next, you simply fold the dough over itself a few times (rather than kneading it), and allow it to briefly rest at room temp.
When done, the dough is covered and placed into the fridge to very slowly rise and develop for at least 12 hours, up to 72 hours—that's it, super easy!
What's nice about this is that you can basically prepare your dough up to 3 days ahead of when you'd like to enjoy your pizza, and forget about it until you're ready to top and bake it up, nice and fresh!
As far as toppings go, it's entirely up to you. But for the sake of my recipe here, and since my hubby and I love spicy Italian sausage, black olives, fresh basil, and spicy marinara sauce (I use my own homemade marinara), those toppings are what I'm listing for this recipe.
Here's a sneak peek at my cast iron pizza recipe: (or just jump to the full recipe...)
- I add the dry pizza dough ingredients to a large bowl, and mix together with warm water and some olive oil for a minute or two until things come together into a dough ball; then, I allow this dough to rest for five minutes.
- After 5 minutes, I do the “fold over” technique with the dough by placing my hand into the bowl and lifting the dough up and over itself, turning the bowl 90 degree with each turn, for a total of four turns. Then, I let the dough rest for 5 minutes, and then repeat the fold over technique (and 5 minute rest period) another 3 times, for a total of 4 fold-over intervals.
- After the pizza dough has been folded over, I allow it to rest covered, at room temp, for 40 minutes; then, I place it into the fridge to slowly rise for at least 12 hours, up to 72 hours.
- To prepare the pizza the day of baking, I take the pizza dough out of the fridge about 2 ½ hours before I plan on baking it.
- When ready to use the dough, I oil the cast iron skillet and place the dough in it, turning it over once to coat both sides in oil; and using my fingertips, I sort of gently press the dough all the way to the edges of the skillet (if dough springs back, I let it rest for 15 minutes, and press again.)
- I allow the dough to rest and proof, covered, in the cast iron skillet for 2 hours until puffy; then, I preheat my oven to 450°; and once hot, I top my pizza and bake it on the bottom rack for about 22 to 24 minutes, until deeply golden-brown on top, and a lighter golden-brown on the bottom.
Recipe
Cast Iron Pizza
by Ingrid Beer

Category: Entree
Cuisine: Italian American
Yield: Serves 4
Nutrition Info: 526 calories (per two wedges)
Prep Time: 1 hour (not including total rest time for dough)
Cook time: 24 minutes
Total time: 1 hour, 24 minutes
Pizza Dough Ingredients:
- 2 cups all-purpose flour
- 1 teaspoon sugar
- 1 teaspoon salt
- 2 teaspoons Italian seasoning
- ½ teaspoon instant yeast (or active dry yeast)
- ¾ cup lukewarm water
- 2 tablespoons olive oil, plus more for the skillet
Topping Ingredients:
- 1 ¾ cups grated, whole-milk mozzarella cheese
- ½ cup marinara sauce (homemade or store-bought)
- ½ cup cooked and crumbled spicy Italian sausage (1 link)
- ¼ cup sliced black olives
- Fresh basil leaves, torn, for garnish
- To prepare your pizza dough, add your flour, sugar, salt, Italian seasoning and yeast into a large bowl, and whisk to blend; slowly drizzle in the water and the olive oil, and using a wooden spoon (or even your clean hands), mix together for 1-2 minutes until the dough comes together to form a sticky ball; cover the bowl with plastic wrap and allow the dough to rest for 5 minutes.
- After 5 minutes, you will do the “fold-over” technique with the dough: place your hand into the bowl on the side of the dough as if you're going to lift it out, but instead, pull the dough up and over itself, turning the bowl 90 degrees with each turn, for a total of 4 fold-over turns; allow the dough to rest 5 minutes.
- Once again, do another round of folding the dough up and over itself, turning the bowl 90 degrees with each fold-over, for a total of 4 fold-over turns. Allow the dough to rest again for 5 minutes.
- Do this fold-over technique for a third time, allow the dough to rest again for 5 minutes, then do it once more for a fourth and final time.
- Cover the dough and allow it to rest for 40 minutes at room temp, then place into the fridge for at least 12 hours, or up to 72 hours.
- When ready to bake your pizza, remove the pizza dough from the fridge about 2 ½ - 3 hours beforehand; drizzle about 2 tablespoons of olive oil into your cast iron skillet and grease it well, then add the dough in and turn it to coat both sides in the oil.
- Gently press the dough towards the edge of the skillet, dimpling it with your fingertips, until it reaches the edge (if the dough shrinks back, allow it to rest for 15 minutes, then try again; repeat if necessary).
- Once you have your pizza dough pressed all the way to the edge of your skillet, cover in plastic wrap and allow the dough to proof for 2 hours in a warm spot in your kitchen, slowly puffing up.
- About 20-30 minutes before baking, preheat your oven to 450°, and place your oven rack on the lower third section of the oven.
- Once the oven is hot, top your pizza by sprinkling about 1 cup of the cheese onto the pizza dough all the way to the edges (it'll bake into the edges of the crust), then dollop spoonfuls of your sauce over the cheese; next, sprinkle over another ½ cup of the cheese (reserving the remaining ¼ cup), and add the browned sausage and olives in a single layer.
- Place the pizza into the oven to bake for about 20 minutes; then, remove the pizza and sprinkle over the reserved ¼ cup of cheese, and place the pizza back into the oven for 2-4 minutes more until that cheese is melted and the pizza is golden on top, as well as golden-brown underneath when lifted slightly with a spatula.
- Remove the pizza from the oven and carefully run a knife along the edges to release any baked on cheese for easier removal; allow the pizza to rest in the skillet for 5 minutes.
- When you can handle the pizza, carefully lift it out of the cast iron skillet and place it onto a cutting board; then, cut into 8 wedges, sprinkle with fresh basil, and serve.
Tips & Tidbits for my Cast Iron Pizza:
- Cast iron skillet, or other pan: Use a large cast iron skillet that is 10” to 12” across to cook the pizza in. But if you don't happen to have a cast-iron skillet, don't worry! Use a 10” cake pan or a 9” rectangular pan instead.
- Instant yeast, or active dry yeast: I experimented with both instant yeast and active dry yeast for the pizza dough and found the crust prepared with instant yeast to be a bit puffier and lighter. Both kinds of yeast work well (use the same amount for either), but if you happen to have the instant yeast available, I recommend using that.
- Let the pizza dough rest: My experience with the pizza dough is that I like to leave it in the fridge for about 48 hours, so I prep it a couple of days ahead of when I'd like to make my pizza. I think this little bit of extra time is nice, but as long as you allow for at least 12 hours of rest you should be fine, but no longer than 72 hours.
- Savory, herby flavor to the crust: I add in a couple of teaspoons of Italian seasoning to my pizza dough, and this creates such delicious flavor! However, if you prefer a more plain/classic crust, leave the herbs out.
- Add a layer of cheese as the first topping: To help prevent the pizza crust from getting soggy as the pizza bakes, add some cheese to the crust as a barrier first, then add the sauce, more cheese and the rest of the toppings.
- Don't go too heavy on the toppings: While I tend to want to add loads of toppings, I found that going a bit more conservatively is best with pizza. This way, the crust bakes evenly and all the way through rather than becoming soggy. Rest assured, I based my ingredient quantities for this recipe on my winning experiment. (We like extra marinara sauce, so I just serve some more on the side for dipping, as desired.)
- Get creative with your toppings: Feel free to add your own choice of toppings to this pizza! You can sub chicken sausage for the spicy Italian, or use green olives in place of black, or none at all. Feel free to use pepperoni, or peppers, onions, mushrooms, etc. Just take care not to over load, and use the quantities I've listed for my ingredients as a guide. You basically want a single layer of toppings.
- Homemade marinara sauce: Feel free to use your favorite store-bought marinara sauce; but if you'd like to use my homemade marinara, it's delicious! Just make a half recipe for this pizza, and you'll have some leftover for dipping.
- Bake the cast iron pizza on the lower rack: Your baked pizza will be deeply golden-brown on top, and super flavorful. (I like to reserve a small amount of cheese to sprinkle on during the last 4 minutes of baking for added “gooey-ness”.) When you pull the pizza out, carefully use a spatula or knife to lift the edge of the pizza up to check and make sure it is cooked through and golden-brown. If the crust needs more time, give it another minute or two.
- Leave the pizza in the cast iron skillet to rest after baking: Before lifting the pizza out and cutting it into wedges, I allow the pizza to rest for roughly 5 minutes in the skillet when it comes out of the oven. This helps it to “relax” a little, and sort of settle into itself. Run a knife along the edge of the pizza to help release any baked on cheese, to make it easier to lift out when ready to cut into slices.
If you're interested, my homemade marinara sauce is terrific on this pizza! Simply prepare a half recipe of it, and you'll have plenty for extra sauce on the side.
Hungry for more cozy pizza recipes? Check out this French Bread Pizza, this Chicken Fajitas Pizza, this Flatbread Pizza, or this Mexican Pizza!


Nick
This sounds really nice, I haven't got a cast iron pan but I have got a pizza stone, do you think that this would be OK?
The Cozy Apron
Hi Nick, this particular pizza is more of a "pan" pizza recipe. In the Tips & Tidbits section, I mention that one could also use a round, 9 or 10" cake pan, or even 9x13 rectangular if you don't have a cast-iron skillet.
You could certainly try it on the stone, but I can't really advise on this method. (Who knows...maybe it'll be terrific!)
Let me know how it turns out if you do try it!
Liz
Can I add sauce first then cheese and rest of ingredients. This is the way most recipes call for?
The Cozy Apron
Hi Liz, please feel free to do the topping steps as you wish.
In my "Tips & Tidbits" section found just below the recipe, I explain why I like to do a portion of the cheese first. (This was a new method for me as well, but it works so wonderfully in preventing the sauce from making a soggy crust.)
After I put the cheese, I just dollop on the sauce evenly (rather than spreading it), and add more of the cheese. It works really well for this particular pizza, but again, please feel free to do as you prefer.
Hope you enjoy! 😉
Barbara
I have made some of your other recipes,I would love to try your pitza but I need gluten free do you think it would work with Bob’s gluten free flour. Thank you so much
The Cozy Apron
Hi Barbara, because I have not tested/prepared this recipe as a gluten-free pizza using gluten-free flour, I am not sure what the texture would be like.
However, here's what I'd say: since you must only eat gluten-free anyway, then I think you should try this out and experiment a bit.
Gluten-free flour will definitely yield different results, as it is the glutens that make a pizza crust chewy/puffy; so I cannot speak to what the texture or consistency of the crust will be. But I wonder if it will still yield a pleasant enough pizza experience in the end, even if using the g.f. flour.
Please let me know how it goes if you do end up trying it out! 🙂
Jan Ronayne
Many thanks Ingrid for this fantastic recipe! I followed all of your great instructions but changed up the toppings with grated pepperoni, finely diced green pepper & some freshly grated Parmesan. It did seem odd to me to start the toppings with the mozzarella but it worked out perfectly. No soggy crust! During these times I’ve been keeping busy trying out many different pizza dough recipes and I’ve never made any of them a second time. I have finally found a “keeper”......thanks again. BTW, your husbands’s photography is excellent!
The Cozy Apron
Hi Jan, I appreciated your comment so much! I'm thrilled you enjoyed this recipe. I look at it a bit like a fun "kitchen project" whenever I make pizza at home, and this recipe truly is our favorite one to prepare in our kitchen. 🙂
May you enjoy it for a long time to come, topping it with all your favorite fix-ins!
And by the way...thanks for the compliment on the photos. These are actually shots that I've taken, as I've been shooting all of our new recipes since 2018. But everything I've learned, I've learned thanks to my hubby and his amazing tutelage! 😉
Linda H
What size cast iron pan are you using for this recipe? I have a 12" but having a hard time finding a recipe for the dough for that size. Thank you.
The Cozy Apron
Hi Linds, my cast iron pan measures 10" at the base (inside bottom). You could still try and use the recipe, just know that the crust may be a little thinner. If you don't mind that, it should still work.
Sherry
Can you make the pizza without refrigerating the dough first?
The Cozy Apron
Hi Sherry, for this particular dough and the method that is used, it must rest in the fridge for at least 12 hours. This allows for the yeast to slowly work and create a light, airy crust (this is meant to be a slow fermentation). If you use immediately without allowing for resting in the fridge, then the dough will be dense and quite heavy.